Load Balancer example
A simple Load Balancer for RemoteViz using Node.js.
Information about Node.js and NPM can be found here: https://docs.npmjs.com/downloading-and-installing-node-js-and-npm
Load balancers are commonly deployed when a web application needs multiple servers because the volume of requests is too much for a single server to handle efficiently. This example shows you how to create a simple load balancer using Node.js to distribute incoming RemoteViz client requests to a service selected among a group of services in order to prevent overload and ensure the best user experience.
It includes three different parts:
- A web server, to serve web pages:
The web server exposes port 8082.
- A Load balancer, to spread the load between several RemoteViz services:
The load balancer is hosted as a front-end server (reverse proxy), it publicly exposes port 80. It redirects incoming HTTP requests to the web server and incoming RemoteViz websocket connections to an available RemoteViz service.
The load balancer contains a registration REST API that stores the status of all service instances in a SQLite database:Path: "/instance", Method: "POST"; Register an instance from an IP address and a port. Returns the registered instance object in JSON.
Path: "/instance/:id", Method: "DELETE"; Unregister an instance from an ID.
A renderArea object is created by the load balancer when the first incoming connection requests it: This enables to manage concurrent access to the same renderArea.Path: "/renderArea/:id", Method: "DELETE": Consider the renderArea as destroyed.
- A load balanced RemoteViz service:
Each started/stopped load balanced RemoteViz service instance will register/unregister to the load balancer using the registration REST API exposed on port 8081. Service instances will also notify the load balancer when a renderArea is destroyed using the REST API.
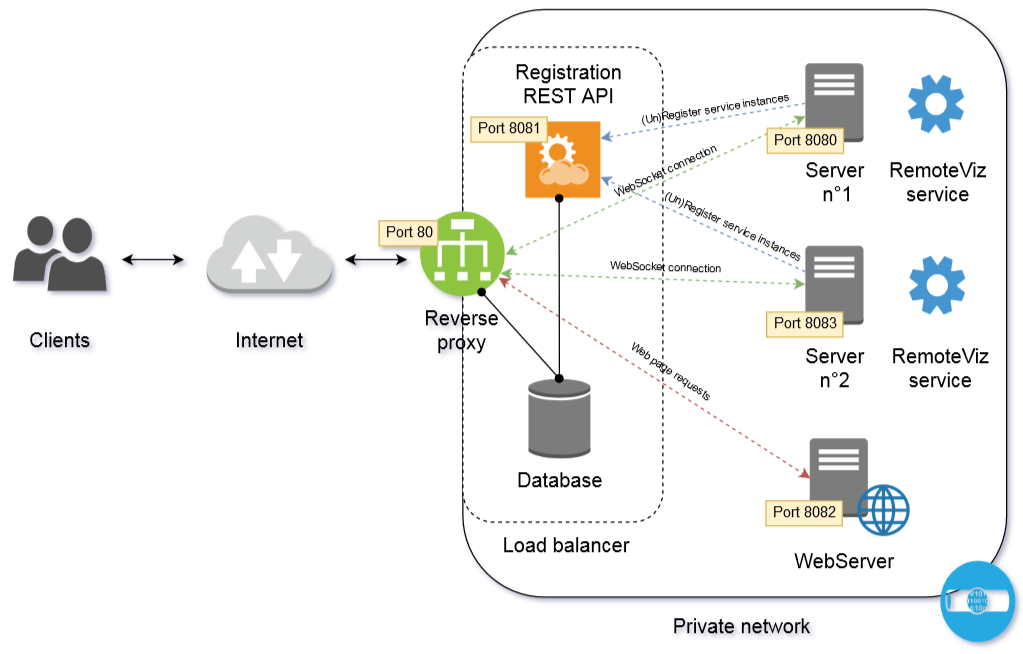
The load balancer applies the following logic (can be customized according to your needs) to load balance incoming RemoteViz connections:
- If the RenderArea requested by the incoming connection is already hosted by an instance, the connection is redirected to this instance.
- Else if the RenderArea requested by the incoming connection does not exist (i.e. not already hosted by an instance), the connection will be redirected to the instance hosting the smallest number of renderAreas.
If a service instance goes down, the load balancer will detect this failure when a new incoming connection tries to be established and remove this instance from the SQLite database.
If the load balancer goes down, a restart will automatically reload its previous state, stored in the SQLite database.
The configuration of IP address, port number, and database path can be changed by editing the configuration file "RemoteViz/LoadBalancing/LoadBalancer/config/config.json".
Run the example:
-
Go to "OIVHOME/examples/source/RemoteViz/LoadBalancing/LoadBalancer".
- Run "npm install" to install all the necessary Node.js dependencies.
- Run "npm run start-webserver" to start the webserver.
- Run "npm run start-loadbalancer" to start the loadbalancer.
-
Go to "OIVHOME/examples/bin/OIVARCH/RemoteViz".
-
Run the executable "LoadBalancedRenderingService".
By default, the service will be bound on 127.0.0.1 IP address with port 8080.
You can change the IP address and port number of the service with arguments. For instance: "LoadBalancedRenderingService 127.0.0.1 8083". (Do not use ports 80, 8081 and 8082, as they are already taken by the loadbalancer and webserver)
-
Run the executable "LoadBalancedRenderingService".
-
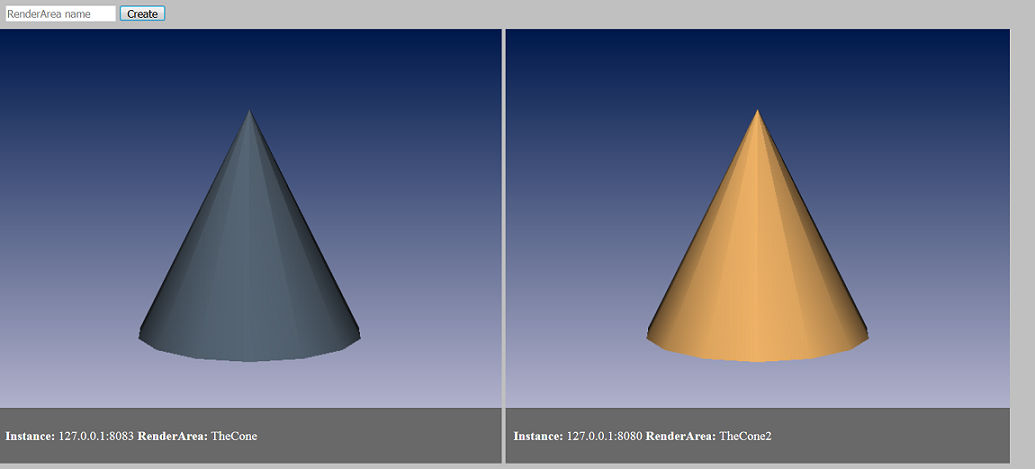
Open your favorite web browser and navigate to "127.0.0.1".
- Repeat step 2. to add another instance, use the form on the top of the web page (opened in step 3.) to create a new RenderArea or duplicate an existing one.
The example displays a colored cone (all the renderAreas in one service instance use the same color) and a panel with the IP address, the port number of the connected service and the renderArea ID.
The database can be reset by deleting the ".sqlite3" file specified in the configuration file.
SCREENSHOT:
FILES:
- RemoteViz/LoadBalancing/LoadBalancer/database.js
- RemoteViz/LoadBalancing/LoadBalancer/package.json
- RemoteViz/LoadBalancing/LoadBalancer/loadbalancer-controller.js
- RemoteViz/LoadBalancing/LoadBalancer/loadbalancer-server.js
- RemoteViz/LoadBalancing/LoadBalancer/loadbalancer-service.js
- RemoteViz/LoadBalancing/LoadBalancer/webserver.js
- RemoteViz/LoadBalancing/LoadBalancer/test/test-database.js
- RemoteViz/LoadBalancing/LoadBalancer/config/config.json
- RemoteViz/LoadBalancing/LoadBalancedService/include/httplib.h
- RemoteViz/LoadBalancing/LoadBalancedService/include/json.hpp
- RemoteViz/LoadBalancing/LoadBalancedService/include/LoadBalancedRenderAreaListener.h
- RemoteViz/LoadBalancing/LoadBalancedService/include/LoadBalancedServiceListener.h
- RemoteViz/LoadBalancing/LoadBalancedService/include/LoadBalancerClient.h
- RemoteViz/LoadBalancing/LoadBalancedService/src/LoadBalancedRenderAreaListener.cxx
- RemoteViz/LoadBalancing/LoadBalancedService/src/LoadBalancedServiceListener.cxx
- RemoteViz/LoadBalancing/LoadBalancedService/src/main.cxx