Example : Tutorial01.cxx 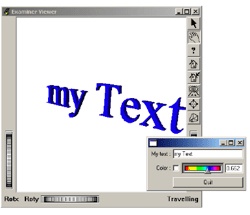 This example of DialogViz shows you how to build a simple dialog window and make it interact with your application.
The string you write in the SoDialogEditText component is directly connected to the SoText3 in the viewer. The slider allows the text color to be changed using a DialogViz auditor.
This tutorial is located in $OIVHOME/src/DialogViz/examples/2D/samples.
C++ :
#include ...
// Define auditor for dialog and viewer interaction
class ButtonAuditor : public SoDialogPushButtonAuditor
{
public:
void
dialogPushButton( SoDialogPushButton* pb )
{
exit( 1 );
}
};
class SliderAuditor : public SoDialogRealSliderAuditor
{
public:
void
dialogRealSlider( SoDialogRealSlider* rs )
{
const float value[][3] = { rs->value.getValue(), 1, 1 };
myColor->rgb.setHSVValues( 0, 1, value );
}
};
int
main( int, char** argv )
{
// Initialize Inventor and DialogViz
Widget myWindow = SoXt::init( argv[0] );
SoDialogViz::init();
// build the viewer scene graph
SoSeparator* root = new SoSeparator;
root->ref();
myColor = new SoBaseColor;
myColor->rgb.setValue( 1, 0, 0 );
root->addChild( myColor );
myText = new SoText3;
root->addChild( myText );
myViewer = new SoXtExaminerViewer( myWindow );
// Build the dialog scene graph
SoTopLevelDialog* myDialog = new SoTopLevelDialog;
SoDialogEditText* myEdit = new SoDialogEditText;
myEdit->label = "My text : ";
myEdit->editText = "my Text";
myText->string.connectFrom( &myEdit->editText );
myDialog->addChild( myEdit );
SoDialogRealSlider* mySlider = new SoDialogRealSlider;
mySlider->label = "Color : ";
const SbColor color[8] = { SbColor( 1, 0, 0 ), SbColor( 1, 1, 0 ), SbColor( 1, 1, 0 ), SbColor( 0, 1, 0 ),
SbColor( 0, 1, 1 ), SbColor( 0, 0, 1 ), SbColor( 1, 0, 1 ), SbColor( 1, 0, 0 ) };
mySlider->colors.setValues( 0, 8, color );
mySlider->addAuditor( new SliderAuditor() );
myDialog->addChild( mySlider );
SoDialogPushButton* myButton = new SoDialogPushButton;
myButton->buttonLabel = "Quit";
myButton->addAuditor( new ButtonAuditor() );
myDialog->addChild( myButton );
// Show all
myDialog->buildDialog( myWindow, FALSE );
myDialog->show();
myViewer->setSceneGraph( root );
myViewer->show();
SoXt::show( myWindow );
SoXt::mainLoop();
return 0;
}
Simple 3D Example
Example : Simple 3D menu 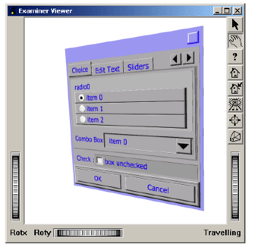 This example shows how to build a simple DialogViz interface and load it as ordinary Inventor nodes in a viewer. The dialog box is loaded from an Inventor file.
This tutorial is located in $OIVHOME/src/DialogViz/examples/3D/simple3DMenu.
Here is the Inventor File:
#Inventor V2.1 ascii
TopLevelDialog
{
TabDialog
{
RowDialog
{
label "Choice"
DialogRadioButtons
{
label "radio0"
items ["item 0",
"item 1", "item 2"]
}
DialogComboBox
{
label "Combo Box"
items ["item 0", "item 1"]
}
}
DialogEditText
{
label "Edit Text"
editText "What a cool demo !"
}
RowDialog
{
label "Sliders"
DialogIntegerSlider
{
label "Integer :"
max 10
}
DialogSeparator {}
DialogRealSlider
{
label "Real :"
value 0.5
}
}
}
DialogCheckBox
{
label "Check :"
onString "box checked"
offString "box unchecked"
}
ColumnDialog
{
edgeStyle SHADOW_OUT
DialogPushButton
{
buttonLabel "OK"
}
DialogPushButton
{
buttonLabel "Cancel"
}
}
}
Here is the program source code:
C++ :
#include ...
int
main( int, char** argv )
{
// Initialize Inventor and DialogViz.
Widget myWindow = SoXt::init( argv[0] );
SoDialogViz::init();
SoSeparator* root = new SoSeparator();
root->ref();
SoDialogViz::setSkinsDirectory( "texture" );
SoTopLevelDialog* myDialog = ( SoTopLevelDialog\* )SoDialogViz::loadFromFile( "./simple3DMenu.iv" );
root->addChild( myDialog );
SoXtExaminerViewer* myViewer = new SoXtExaminerViewer( myWindow );
myViewer->setBackgroundColor( SbColor( 1, 1, 1 ) );
myViewer->setSceneGraph( root );
myViewer->viewAll();
// then show.
myViewer->show();
SoXt::show( myWindow );
SoXt::mainLoop();
SoXt::finish(); // finish Inventor
return 0;
}
