From a given scene graph containing a camera, this action generates an image file (an off-screen rendering of the scene graph) and an HTML file. The HTML file contains a reference to the image file (<IMG>) and the image map (<MAP>). Each region of the image map will have a URL associated with it.
With HTML, image maps allow you to specify regions of an image and assign a specific action to each region (a link can be associated with each map). When the region is clicked by the user, the action is executed.
Each region of the image is determined by a subgraph which is under an SoWWWAnchor SoWWWAnchor SoWWWAnchor group node.
The generated HTML file contains, in the following order:
An image map tag that defines the region corresponding to each subgraph that is under an SoWWWAnchor SoWWWAnchor SoWWWAnchor group node. For each region, the associated link is the URL defined either by the SoWWWAnchor SoWWWAnchor SoWWWAnchor node.
An image tag that references the image generated by SoToHTMLAction SoToHTMLAction SoToHTMLAction .
The constructor does not take any parameters. You can create the object the following ways:
SoToHTMLAction *myAction = new SoToHTMLAction();
SoToHTMLAction myAction = new SoToHTMLAction();
SoToHTMLAction myAction = new SoToHTMLAction();
or
SoToHTMLAction myAction; // allocation on the stack
By default, the HTML output goes to stdout, but you can specify an output file.
myAction->openHTMLFile("myFile.html");
myAction.OpenHTMLFile("myFile.html");
myAction.openHTMLFile("myFile.html");
Alternatively, you can specify an output file by assigning a file pointer. For example:
FILE *fp = fopen("myFile.html","w");
myAction->setHTMLFilePointer(fp);
The current file pointer can be retrieved by:
const FILE *fp = myAction->getHTMLFilePointer();
By default, the image file is image.jpg, but you can specify a different file name.
myAction->setImageURLName("myImageURL.jpg");
myAction.SetImageURLName("myImageURL.jpg");
myAction.setImageURLName("myImageURL.jpg");
The current image URL can be retrieved by:
const char *myImageURLName = myAction->getImageURLName();
string myImageURLName = myAction.GetImageURLName();
String myImageURLName = myAction.getImageURLName();
Alternatively, you can specify the image by assigning a file pointer:
FILE *fp = fopen("myImageFile.jpg","wb");
myAction->setImageFilePointer(fp);
The current file pointer can be retrieved by:
const FILE *fp = myAction->getImageFilePointer ();
You can specify the format used to generate the image:
myAction->setImageFormat(SoToHTMLAction::JPEG_FORMAT);
myAction.SetImageFormat(SoToHTMLAction.ImageFormats.JPEG_FORMAT);
myAction.setImageFormat(SoToHTMLAction.ImageFormats.JPEG_FORMAT);
To specify the quality of the output, from 0.0 (worst) to 1.0 (best):
float quality;
quality = 0.75;
myAction->setImageQuality(quality);
float quality;
quality = 0.75f;
myAction.SetImageQuality(quality);
float quality;
quality = 0.75f;
myAction.setImageQuality(quality);
For JPEG output this specifies the amount of compression used to generate/store the JPEG image.
Next, specify the components used to describe the image pixels:
myAction->setImageComponents(SoToHTMLAction::RGB);
myAction.SetImageComponents(SoToHTMLAction.Components.RGB);
myAction.setImageComponents(SoToHTMLAction.Components.RGB);
You can chose from:
LUMINANCE
LUMINANCE_TRANSPARENCY
RGB
RGB_TRANSPARENCY
By default, the image component is RGB.
To specify the background color to be used for the image:
// Specify a RED background.
myAction->setImageBackgroundColor(SbColor(1,0,0));
// Specify a RED background.
myAction.SetImageBackgroundColor(new SbColor(1, 0, 0));
// Specify a RED background.
myAction.setImageBackgroundColor(new SbColor(1, 0, 0));
To specify the size of the image:
// This will create a 200x200 image.
myAction->setViewportRegion(SbViewportRegion(200,200));
// This will create a 200x200 image.
myAction.SetViewportRegion(new SbViewportRegion(200, 200));
// This will create a 200x200 image.
myAction.setViewportRegion(new SbViewportRegion((short)200, (short)200));
The image format, image quality, image component, background color, and size can be retrieved by:
SoToHTMLAction::ImageFormat format = myAction->getImageFormat();
float quality = myAction->getImageQuality();
SoToHTMLAction::Component components = myAction->getImageComponents();
const SbColor backColor = myAction-> getImageBackgroundColor();
const SbViewportRegion size = myAction->getViewportRegion();
SoToHTMLAction.ImageFormats format = myAction.GetImageFormat();
float quality = myAction.GetImageQuality();
SoToHTMLAction.Components components = myAction.GetImageComponents();
SbColor backColor = myAction.GetImageBackgroundColor();
SbViewportRegion size = myAction.GetViewportRegion();
SoToHTMLAction.ImageFormats format = myAction.getImageFormat();
float quality = myAction.getImageQuality();
SoToHTMLAction.Components components = myAction.getImageComponents();
SbColor backColor = myAction.getImageBackgroundColor();
SbViewportRegion size = myAction.getViewportRegion();
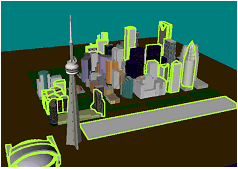
Each SoWWWAnchor SoWWWAnchor SoWWWAnchor node traversed during the action will generate a different region of the image map. The shape of each of these regions can be specified by:
myAction->setRegionShapeType(SoToHTMLAction::RECTANGLE);
myAction.SetRegionShapeType(SoToHTMLAction.ShapeTypes.RECTANGLE);
myAction.setRegionShapeType(SoToHTMLAction.ShapeTypes.RECTANGLE);
The shape can be specified as:
RECTANGLE
CIRCLE
POLYGON
NONE (in this case no regions are generated)
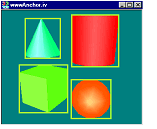
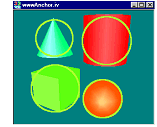
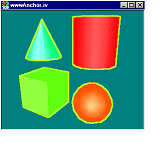
The following figures are generated from a scene graph made of four shapes, with each shape belonging to a different SoWWWAnchor SoWWWAnchor SoWWWAnchor

The bounding rectangle of the projection of the SoWWWAnchor SoWWWAnchor SoWWWAnchor projected to screen space is computed, and this rectangle is used to specify the region border.
Figure 13.4. Rectangle image map
This allows your browser to keep track of the pointer location in the image map and highlight a particular region whenever you enter it. By default, highlighting is on and can be disabled if necessary.
myAction->setMapHighlight(FALSE);
myAction.SetMapHighlight(false);
myAction.setMapHighlight(false);
The current highlighting value can be retrieved by:
SbBool highlight = myAction->isMapHighlight();
bool highlight = myAction.IsMapHighlight();
boolean highlight = myAction.isMapHighlight();
The apply() method is inherited from the SoAction SoAction SoAction base class. Apply the action to the group where you want traversal to start. If you want to generate an image map of the whole scene graph, apply the action to the root of the scene graph.
myAction->apply(mySceneRoot);
myAction.Apply(mySceneRoot);
myAction.apply(mySceneRoot);
Applying the action will automatically generate the “.html” file and the image file. The “.html” file will include the MAP tag with definitions of the regions and the IMG tag with the URL of the image file. For example, the previous figure showing a RECTANGLE border shape could have the following HTML file:
Example 13.4. HTML file and image map
<HTML>
  <BODY>
  <MAP NAME="title1">
  <AREA SHAPE="RECT" COORDS="152,155,239,242" HREF="sphere.htm">
  <AREA SHAPE="RECT" COORDS="38,122,144,229" HREF="cube.htm">
  <AREA SHAPE="RECT" COORDS="153,10,256,126" HREF="cylinder.htm">
  <AREA SHAPE="RECT" COORDS="51,18,128,107" HREF="cone.htm">
  </MAP>
  <CENTER>
  <IMG SRC="image1.jpg"
  USEMAP="#title1"
  BORDER 0>
  </CENTER>
  </BODY>
</HTML>
After applying the action, you may want to close the file opened with the openHTMLFile() method:
myAction->closeHTMLFile();
myAction.CloseHTMLFile();
myAction.closeHTMLFile();
The example:$OIVHOME/src/Inventor/examples/Features/IvToHTMLAction/IvToHTMLAction.cxx puts into practice the previously described steps.


