An example program illustrating the features described in this section is available at:
$OIVHOME/src/Inventor/examples/Features/TextExtensions/TextProperties/TextProperties.cxx.
The SoFont SoFont SoFont property class has been extended to support stroke fonts. They are specified using the name field. For instance, the following string (value for the name field) designates one of the available stroke fonts: “TGS_Simplex_TGS”.
Stroke fonts, which are drawn with vectors rather than triangles, can provide higher performance and also better readability at small sizes. Stroke fonts can be used with SoText3 SoText3 SoText3 and SoAnnoText3 SoAnnoText3 SoAnnoText3 . They cannot be extruded.
Stroke fonts are subject to the current line attributes, line width, and line pattern, which are specified with the property node SoDrawStyle SoDrawStyle SoDrawStyle .
![[Note]](../images/note.jpg) | |
By default, the stroke font files are found in $OIVHOME/data/fonts. If you move them to a different directory, you must set the environment variable OIV_STROKE_FONT_PATH to be the path to the new directory. On Win32 systems, if the current font is not one of the stroke fonts, the text string will be displayed using a Windows font. |
Additional stroke font files are available for Kanji and Katakana output. To produce Kanji or Katakana stroke output, set the font to any one of the stroke font names. Then, for the text string, pass the desired multi-byte character string (MBCS) to Open Inventor using the usual techniques. The font file name is not used except as a flag to indicate that stroke output should be produced.
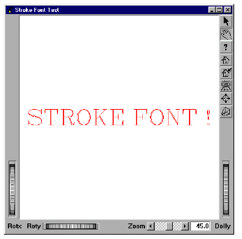
Example 6.5. How to use stroke fonts

This example displays text using stroke fonts. The program source code can be found in:
$OIVHOME/src/Inventor/examples/Features/StrokeFont/StrokeFont.cxx.
int
main(int, char **argv)
{
  Widget myWindow = SoXt::init(argv[0]);
  if(myWindow == NULL) exit(1);
  SoGroup *root = new SoGroup;
  root->ref();

  // Choose a font
  SoFont *myFont = new SoFont();

  // The Stroke Font !
  myFont->name.setValue("TGS_Complex_Roman");
  myFont->size.setValue(0.2f);
  root->addChild(myFont);
  SoBaseColor *myBaseColor = new SoBaseColor();
  myBaseColor->rgb.setValue(SbColor(1.0f, 0.0f, 0.0f));
  root->addChild(myBaseColor);

  // Add Text3D with stroke font.
  SoText3 *strokeFontText = new SoText3();
  strokeFontText->string = "STROKE FONT !";
  root->addChild(strokeFontText);

  SoXtExaminerViewer *myViewer = new SoXtExaminerViewer(myWindow);
  myViewer->setSceneGraph(root);
  myViewer->setTitle("Stroke Font Test");

  myViewer->show();
  myViewer->viewAll();

  SoXt::show(myWindow);
  SoXt::mainLoop();
  return 0;
}
SoGroup root = new SoGroup();

// Choose a font
SoFont myFont = new SoFont();

// The Stroke Font !
myFont.name.Value = "TGS_Complex_Roman";
myFont.size.Value = 0.2f;
root.AddChild(myFont);
SoBaseColor myBaseColor = new SoBaseColor();
myBaseColor.rgb.SetValue(new SbVec3f(1.0f, 0.0f, 0.0f));
root.AddChild(myBaseColor);

// Add Text3D with stroke font.
SoText3 strokeFontText = new SoText3();
strokeFontText.stringField.SetValue("STROKE FONT !");
root.AddChild(strokeFontText);

SoWinExaminerViewer myViewer = new SoWinExaminerViewer(this, "", true,
	  SoWinFullViewer.BuildFlags.BUILD_ALL, SoWinViewer.Types.BROWSER);
myViewer.SetSceneGraph(root);
myViewer.SetTitle("Stroke Font Test");

myViewer.Show();
myViewer.ViewAll();
SoGroup root = new SoGroup();

// Choose a font
SoFont myFont = new SoFont();

// The Stroke Font !
myFont.name.setValue("Times_Roman");
myFont.size.setValue(0.2f);
root.addChild(myFont);
SoBaseColor myBaseColor = new SoBaseColor();
myBaseColor.rgb.setValue(new SbVec3f(1.0f, 0.0f, 0.0f));
root.addChild(myBaseColor);

// Add Text3D with stroke font.
SoText3 strokeFontText = new SoText3();
strokeFontText.string.setValue("STROKE FONT !");
root.addChild(strokeFontText);

myViewer = new SwSimpleViewer(SwSimpleViewer.EXAMINER);
myViewer.setSceneGraph(root);
myViewer.setName("Stroke Font");
myViewer.viewAll();

panel.add(myViewer);
add(panel);
The renderStylefield of the SoFont SoFont SoFont node allows the user to specify how the text should be rendered. The different values of this field are POLYGON, TEXTURE, TEXTURE_DELAYED, and POLYGON_AND_OUTLINE. These different styles are described in the following sections.
This style is the normal rendering style for Open Inventor text (SoText3 SoText3 SoText3 and SoAnnoText3 SoAnnoText3 SoAnnoText3 ). Each character in a polygonal text string is created by extruding an outlined version of the character. SoText3 SoText3 SoText3 allows you to specify which part(s) of the polygonal definition you want to display. You can choose to see all faces of all characters, only the front faces, only the back faces, and/or only the extruded sides.
![[Warning]](../images/warning.jpg) | |
If a stroke font is used, the text is rendered with lines rather than faces. Line attributes are applied instead of polygon attributes. Stroke text is not extruded. |
![[Important]](../images/important.jpg) | |
The size of SoText3 SoText3 SoText3 is expressed in the current units. Thus, when text is far from the camera and very small, you may see some visual artifacts due to the polygon fill, and text readability may become quite poor. |
For information on beveled text, refer to the section called “Advanced Use of 3D Text (Advanced)” in The Inventor Mentor.
Setting the renderStyle field value to TEXTURE causes the text to be rendered using textures. This render style produces very high quality text with an antialiased appearance. This render style greatly increases the text readability for small font sizes, and when the text is displayed in a wide-angle perspective view. The generated texture quality depends on the value field of the SoComplexity SoComplexity SoComplexity node.
Setting the renderStyle to TEXTURE_DELAYED allows delayed rendering of just the textured text strings. This can avoid transparency artifacts along the edges of the characters, but can also reduce performance due to less efficient render caching.
![[Important]](../images/important.jpg) | |
Textured glyphs are generated using the FreeType library. |
The POLYGON_AND_OUTLINE render style draws the outline of the polygonal text (SoText3 SoText3 SoText3 and SoAnnoText3 SoAnnoText3 SoAnnoText3 ). This outline increases the quality for small font sizes (relative to the viewer size) of polygonal text in filled mode (SoDrawStyle::FILLED). If you want to draw only the outline, use this render style and draw in wireframe mode (SoDrawStyle::LINES).
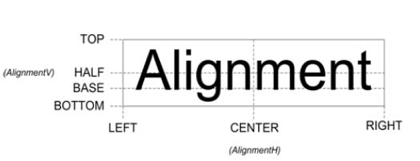
SoTextProperty SoTextProperty SoTextProperty has two fields for specifying the text alignment:
Default text alignment is LEFT, BASE.

![[Important]](../images/important.jpg) | |
The alignmentH value is used for text alignment only when the justification field of text nodes is set to INHERITED. |
Since Open Inventor 6.0, text orientation can be specified using the orientationfield of SoTextProperty SoTextProperty SoTextProperty . Available values are LEFT_TO_RIGHT (default), RIGHT_TO_LEFT, TOP_TO_BOTTOM and BOTTOM_TO_TOP.
As an example, here is the rendering of two different strings with opposite horizontal orientation.
The specified text to display is:
SoText3* myText = new SoText3;
myText->string.set1Value(0, "Left To Right");
myText->string.set1Value(1, "tfeL oT thgiR");
SoText3 myText = new SoText3();
myText.stringField.Set1Value(0, "Left To Right");
myText.stringField.Set1Value(1, "tfeL oT thgiR");
SoText3 myText = new SoText3();
myText.string.set1Value(0, "Left To Right");
myText.string.set1Value(1, "tfeL oT thgiR");
And the rendering is:
|
|
|
The following text is extracted from the FreeType documentation:
Copyright 1998-2000 David Turner
Copyright 2000 The FreeType Development Team
|
The term kerning refers to specific information used to adjust the relative positions of coincident glyphs in a string of text. Kerning consists of modifying the spacing between two successive glyphs according to their outlines. For example, a “T” and a “y” can be easily moved closer, as the top of the “y” fits nicely under the upper right bar of the “T”. When laying out text with only their standard widths, some consecutive glyphs seem a bit too close or too distant. For example, the space between the “A” and the “V” in the following word seems a little wider than needed.  Compare this to the same word, where the distance between these two letters has been slightly reduced: As you can see, this adjustment can make a great difference. |
Kerning can be activated in Open Inventor simply by setting the kerning field of SoTextProperty SoTextProperty SoTextProperty to TRUE.
![[Important]](../images/important.jpg) | |
Kerning depends on the specific font used. Not all font files contain kerning information. |


