This chapter begins with a set of sample programs that illustrate the key aspects of Inventor. Basic Hello Cone Program creates a red cone and then renders it in a window (A Red Cone ). This example uses an Inventor Xt window, which is part of the Inventor Component Library. This library provides utilities for window management and event processing and also contains a set of Inventor components (viewers and editors).
The code shown in Basic Hello Cone Program constructs a simple scene graph composed of a camera node, a light node, a material node, and a cone node. Later chapters go into specifics on creating nodes, setting values in fields, structuring the database, and applying actions. The purpose of this chapter is simply to convey a feel for the tools Inventor offers and to help you get started writing an Inventor program.
A Red Cone
The first example program illustrates the basic steps in writing an Inventor program.
- Create a window where the scene will be rendered. This example uses SoXtRenderArea, the Inventor Xt window.
- Build the scene graph by creating property and shape nodes and combining them into groups. Basic Hello Cone Program gives the code to create the cone shown in A Red Cone .
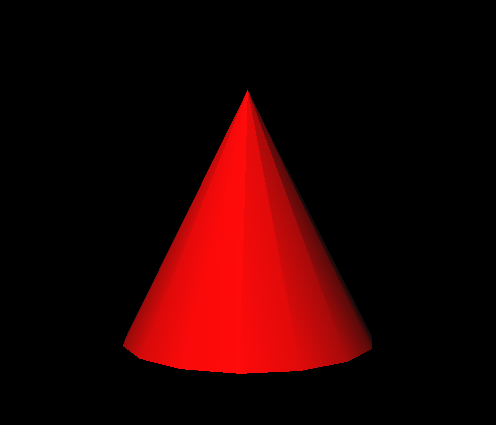
A Red Cone
Example : Basic Hello Cone Program
C++ :
#include <Inventor/Xt/SoXt.h>
#include <Inventor/Xt/SoXtRenderArea.h>
#include <Inventor/nodes/SoCone.h>
#include <Inventor/nodes/SoDirectionalLight.h>
#include <Inventor/nodes/SoMaterial.h>
#include <Inventor/nodes/SoPerspectiveCamera.h>
#include <Inventor/nodes/SoSeparator.h>
main( int, char** argv )
{
// Initialize Inventor. This returns a main window to use.
// If unsuccessful, exit.
Widget myWindow = SoXt::init( argv[0] ); // pass the app name
if ( myWindow == NULL )
exit( 1 );
// Make a scene containing a red cone
SoSeparator* root = new SoSeparator;
SoPerspectiveCamera* myCamera = new SoPerspectiveCamera;
SoMaterial* myMaterial = new SoMaterial;
root->ref();
root->addChild( myCamera );
root->addChild( new SoDirectionalLight );
myMaterial->diffuseColor.setValue( 1.0, 0.0, 0.0 ); // Red
root->addChild( myMaterial );
root->addChild( new SoCone );
// Create a renderArea in which to see our scene graph.
// The render area will appear within the main window.
SoXtRenderArea* myRenderArea = new SoXtRenderArea( myWindow );
// Make myCamera see everything.
myCamera->viewAll( root, myRenderArea->getViewportRegion() );
// Put our scene in myRenderArea, change the title
myRenderArea->setSceneGraph( root );
myRenderArea->setTitle( "Hello Cone" );
myRenderArea->show();
SoXt::show( myWindow ); // Display main window
SoXt::mainLoop(); // Main Inventor event loop
}
C# :
using OIV.Inventor.Nodes;
using OIV.Inventor.Win;
namespace _02_1_HelloCone
{
public partial class MainForm : Form
{
SoWinRenderArea myRenderArea;
public MainForm()
{
InitializeComponent();
CreateSample();
}
public void CreateSample()
{
// Make a scene containing a red cone
SoSeparator root = new SoSeparator();
SoPerspectiveCamera myCamera = new SoPerspectiveCamera();
SoMaterial myMaterial = new SoMaterial();
root.AddChild(myCamera);
root.AddChild(new SoDirectionalLight());
myMaterial.diffuseColor.SetValue(1.0f, 0.0f, 0.0f); // Red
root.AddChild(myMaterial);
root.AddChild(new SoCone());
// Create a renderArea in which to see our scene graph.
myRenderArea = new SoWinRenderArea(this, "", true, true, true);
// Make myCamera see everything.
myCamera.ViewAll(root, myRenderArea.GetViewportRegion());
// Put our scene in myRenderArea, change the title
myRenderArea.SetSceneGraph(root);
myRenderArea.SetTitle("Hello Cone");
}
}
}
Java :
import java.awt.*;
import com.openinventor.inventor.awt.*;
import com.openinventor.inventor.nodes.*;
import tools.DemoInventor;
public class Main extends DemoInventor
{
static SwSimpleViewer myRenderArea;
@Override public void
start()
{
super.start();
setLayout( new BorderLayout() );
Panel panel = new Panel( new BorderLayout() );
myRenderArea = new SwSimpleViewer( SwSimpleViewer.EXAMINER );
// Make a scene containing a red cone
SoMaterial myMaterial = new SoMaterial();
myMaterial.diffuseColor.setValue( 1.0f, 0.0f, 0.0f );
SoPerspectiveCamera myCamera = new SoPerspectiveCamera();
SoSeparator root = new SoSeparator();
{ // assemble scene graph
root.addChild( myCamera );
root.addChild( myMaterial );
root.addChild( new SoCone() );
}
// Make myCamera see everything.
myCamera.viewAll( root, ( myRenderArea.getArea() ).getViewportRegion(), ( float )1.0 );
myRenderArea.setSceneGraph( root );
panel.add( myRenderArea );
add( panel );
}
public static void main( String argv[] )
{
Main applet = new Main();
applet.isAnApplet = false;
applet.start();
demoMain( applet, "Hello Cone" );
}
}
Using Engines to Make the Cone Spin
Hello Cone Using Engines illustrates how to use engines to make the cone spin. An engine is attached to the angle field of an SoRotationXYZ node in the scene graph. The engine changes the angle value in the rotationXYZ node in response to changes in the real-time clock, which in turn causes the cone to rotate. After each change, the scene is automatically rendered again by the render area. Successive rotations give the desired effect of a spinning cone.
Example : Hello Cone Using Engines
C++ :
#include <Inventor/Xt/SoXt.h>
#include <Inventor/Xt/SoXtRenderArea.h>
#include <Inventor/engines/SoElapsedTime.h>
#include <Inventor/nodes/SoCone.h>
#include <Inventor/nodes/SoDirectionalLight.h>
#include <Inventor/nodes/SoMaterial.h>
#include <Inventor/nodes/SoPerspectiveCamera.h>
#include <Inventor/nodes/SoRotationXYZ.h>
#include <Inventor/nodes/SoSeparator.h>
main( int, char** argv )
{
// Initialize Inventor and Xt
Widget myWindow = SoXt::init( argv[0] );
if ( myWindow == NULL )
exit( 1 );
SoSeparator* root = new SoSeparator;
root->ref();
SoPerspectiveCamera* myCamera = new SoPerspectiveCamera;
root->addChild( myCamera );
root->addChild( new SoDirectionalLight );
// This transformation is modified to rotate the cone
SoRotationXYZ* myRotXYZ = new SoRotationXYZ;
root->addChild( myRotXYZ );
SoMaterial* myMaterial = new SoMaterial;
myMaterial->diffuseColor.setValue( 1.0, 0.0, 0.0 ); // Red
root->addChild( myMaterial );
root->addChild( new SoCone );
// An engine rotates the object. The output of myCounter
// is the time in seconds since the program started.
// Connect this output to the angle field of myRotXYZ
myRotXYZ->axis = SoRotationXYZ::X; // rotate about X axis
SoElapsedTime* myCounter = new SoElapsedTime;
myRotXYZ->angle.connectFrom( &myCounter->timeOut );
SoXtRenderArea* myRenderArea = new SoXtRenderArea( myWindow );
myCamera->viewAll( root, myRenderArea->getViewportRegion() );
myRenderArea->setSceneGraph( root );
myRenderArea->setTitle( "Engine Spin" );
myRenderArea->show();
SoXt::show( myWindow );
SoXt::mainLoop();
}
C# :
using OIV.Inventor.Nodes;
using OIV.Inventor.Win;
using OIV.Inventor.Engines;
namespace _02_2_EngineSpin {
public partial class MainForm : Form
{
SoWinRenderArea myRenderArea;
public MainForm()
{
InitializeComponent();
CreateSample();
}
public void
CreateSample()
{
SoSeparator root = new SoSeparator();
SoPerspectiveCamera myCamera = new SoPerspectiveCamera();
root.AddChild( myCamera );
root.AddChild( new SoDirectionalLight() );
// This transformation is modified to rotate the cone
SoRotationXYZ myRotXYZ = new SoRotationXYZ();
root.AddChild( myRotXYZ );
SoMaterial myMaterial = new SoMaterial();
myMaterial.diffuseColor.SetValue( 1.0f, 0.0f, 0.0f ); // Red
root.AddChild( myMaterial );
root.AddChild( new SoCone() );
// An engine rotates the object. The output of myCounter
// is the time in seconds since the program started.
// Connect this output to the angle field of myRotXYZ
myRotXYZ.axis.SetValue( ( int )SoRotationXYZ.AxisType.X ); // rotate about X axis
SoElapsedTime myCounter = new SoElapsedTime();
myRotXYZ.angle.ConnectFrom( myCounter.timeOut );
myRenderArea = new SoWinRenderArea( this, "", true, true, true );
myCamera.ViewAll( root, myRenderArea.GetViewportRegion() );
myRenderArea.SetSceneGraph( root );
myRenderArea.SetTitle( "Engine Spin" );
}
}
} // namespace _02_2_EngineSpin
Java :
import tools.*;
import java.awt.*;
import com.openinventor.inventor.awt.*;
import com.openinventor.inventor.nodes.*;
import com.openinventor.inventor.engines.*;
public class Main extends DemoInventor
{
public static void
main( String[] args )
{
Main applet = new Main();
applet.isAnApplet = false;
applet.start();
demoMain( applet, "Engine Spin" );
}
public void
start()
{
super.start();
setLayout( new BorderLayout() );
Panel panel = new Panel( new BorderLayout() );
SwSimpleViewer myRenderArea = new SwSimpleViewer( SwSimpleViewer.EXAMINER );
// Make a scene containing a red cone
SoMaterial myMaterial = new SoMaterial();
myMaterial.diffuseColor.setValue( 1.0f, 0.0f, 0.0f );
SoPerspectiveCamera myCamera = new SoPerspectiveCamera();
// This transformation is modified to rotate the cone
SoRotationXYZ myRotXYZ = new SoRotationXYZ();
// An engine rotates the object. The output of myCounter is the
// time in seconds since the program started.
// Connect this output to the angle field of myRotXYZ.
myRotXYZ.axis.setValue( SoRotationXYZ.AxisType.X );
SoElapsedTime myCounter = new SoElapsedTime();
myRotXYZ.angle.connectFrom( myCounter.timeOut );
SoSeparator root = new SoSeparator();
{ // assemble scene graph
root.addChild( myCamera );
root.addChild( new SoDirectionalLight() );
root.addChild( myRotXYZ );
root.addChild( myMaterial );
root.addChild( new SoCone() );
}
// Make myCamera see everything.
myCamera.viewAll( root, ( myRenderArea.getArea() ).getViewportRegion(), ( float )1.0 );
// Put our scene in myRenderArea, change the title
myRenderArea.setSceneGraph( root );
panel.add( myRenderArea );
add( panel );
}
}
Adding a Trackball Manipulator
The next two examples show additional methods for editing a node in the scene graph. Hello Cone with a Trackball Manipulator adds a manipulator (a trackball) to the first example (see Cone with Trackball Manipulator ). The trackball itself appears as three rings around the cone. When the left mouse button is pressed on the trackball, it highlights itself in a different color to show it is active. While it is active, the mouse can be used to rotate the trackball and the object (here, the cone) inside it. In this example, a trackball is constructed instead of the SoRotationXYZ node in Hello Cone Using Engines . Each time the user rotates the trackball, its values change and the cone rotates as well. Because the render area has a sensor attached to the scene graph, the scene is automatically rendered again after each edit, and the cone appears to move.
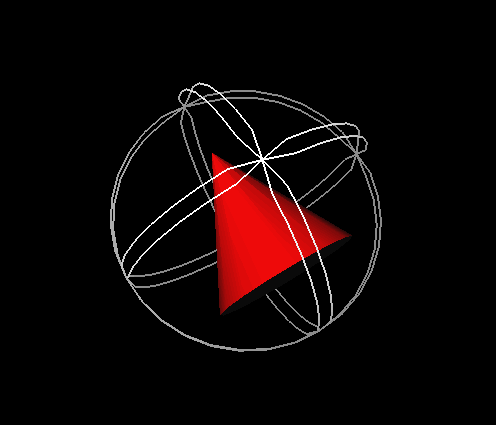
Cone with Trackball Manipulator
Example : Hello Cone with a Trackball Manipulator
C++ :
#include <Inventor/Xt/SoXt.h>
#include <Inventor/Xt/SoXtRenderArea.h>
#include <Inventor/manips/SoTrackballManip.h>
#include <Inventor/nodes/SoCone.h>
#include <Inventor/nodes/SoDirectionalLight.h>
#include <Inventor/nodes/SoMaterial.h>
#include <Inventor/nodes/SoPerspectiveCamera.h>
#include <Inventor/nodes/SoSeparator.h>
main( int, char** argv )
{
// Initialize Inventor and Xt
Widget myWindow = SoXt::init( argv[0] );
if ( myWindow == NULL )
exit( 1 );
SoSeparator* root = new SoSeparator;
root->ref();
SoPerspectiveCamera* myCamera = new SoPerspectiveCamera;
root->addChild( myCamera ); // child 0
root->addChild( new SoDirectionalLight ); // child 1
root->addChild( new SoTrackballManip ); // child 2
SoMaterial* myMaterial = new SoMaterial;
myMaterial->diffuseColor.setValue( 1.0, 0.0, 0.0 );
root->addChild( myMaterial );
root->addChild( new SoCone );
SoXtRenderArea* myRenderArea = new SoXtRenderArea( myWindow );
myCamera->viewAll( root, myRenderArea->getViewportRegion() );
myRenderArea->setSceneGraph( root );
myRenderArea->setTitle( "Trackball" );
myRenderArea->show();
SoXt::show( myWindow );
SoXt::mainLoop();
}
C# :
using OIV.Inventor.Nodes;
using OIV.Inventor.Win;
using OIV.Inventor.Manips;
namespace _02_3_Trackball {
public partial class MainForm : Form
{
SoWinRenderArea myRenderArea;
public MainForm()
{
InitializeComponent();
CreateSample();
}
public void CreateSample()
{
SoSeparator root = new SoSeparator();
SoPerspectiveCamera myCamera = new SoPerspectiveCamera();
root.AddChild( myCamera ); // child 0
root.AddChild( new SoDirectionalLight() ); // child 1
root.AddChild( new SoTrackballManip() ); // child 2
SoMaterial myMaterial = new SoMaterial();
myMaterial.diffuseColor.SetValue( 1.0f, 0.0f, 0.0f );
root.AddChild( myMaterial );
root.AddChild( new SoCone() );
myRenderArea = new SoWinRenderArea( this, "", true, true, true );
myCamera.ViewAll( root, myRenderArea.GetViewportRegion() );
myRenderArea.SetSceneGraph( root );
myRenderArea.SetTitle( "Trackball" );
}
}
} // namespace _02_3_Trackball
Java :
import tools.*;
import java.awt.*;
import com.openinventor.inventor.awt.*;
import com.openinventor.inventor.nodes.*;
import com.openinventor.inventor.manips.*;
public class Main extends DemoInventor
{
public static void main( String[] args )
{
Main applet = new Main();
DemoInventor.isAnApplet = false;
applet.start();
demoMain( applet, "Trackball" );
}
public void start()
{
super.start();
SoPerspectiveCamera myCamera = new SoPerspectiveCamera();
SoMaterial myMaterial = new SoMaterial();
myMaterial.diffuseColor.setValue( 1, 0, 0 );
SoSeparator root = new SoSeparator();
{ // assemble scene graph
root.addChild( myCamera ); // child 0
root.addChild( new SoDirectionalLight() ); // child 1
root.addChild( new SoTrackballManip() ); // child 2
root.addChild( myMaterial );
root.addChild( new SoCone() );
}
SwSimpleViewer myViewer = new SwSimpleViewer( "Examiner Viewer" );
myCamera.viewAll( root, ( ( SwActiveArea )myViewer.getScene() ).getViewportRegion() );
myViewer.setSceneGraph( root );
setLayout( new BorderLayout() );
Panel panel = new Panel( new BorderLayout() );
panel.add( myViewer );
add( panel );
}
}
Adding the Examiner Viewer
Hello Cone Using the Examiner Viewer replaces the render area in the first example with the examiner viewer, a component. This viewer, shown in Cone with Examiner Viewer, modifies the camera node, which lets you view the cone from different positions. It provides a user interface that allows use of the mouse to modify camera placement in the scene. (Note that this example looks similar to the trackball in Hello Cone with a Trackball Manipulator . Here, however, the camera is moving, not the cone itself.) This program does not need to set up a camera and call viewAll() because the viewer does this automatically.
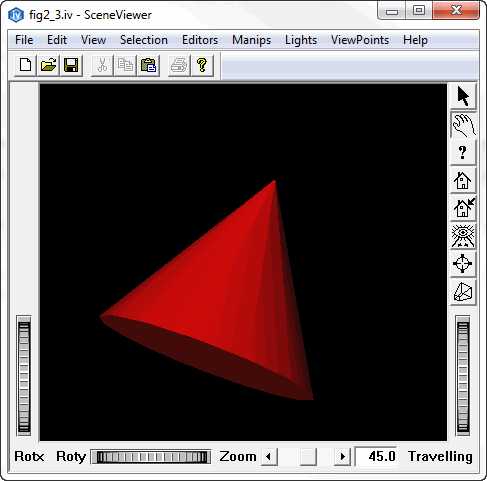
Cone with Examiner Viewer
Example : Hello Cone Using the Examiner Viewer
C++ :
#include <Inventor/Xt/SoXt.h>
#include <Inventor/Xt/viewers/SoXtExaminerViewer.h>
#include <Inventor/nodes/SoCone.h>
#include <Inventor/nodes/SoDirectionalLight.h>
#include <Inventor/nodes/SoMaterial.h>
#include <Inventor/nodes/SoPerspectiveCamera.h>
#include <Inventor/nodes/SoSeparator.h>
main( int, char** argv )
{
Widget myWindow = SoXt::init( argv[0] );
if ( myWindow == NULL )
exit( 1 );
SoSeparator* root = new SoSeparator;
root->ref();
SoMaterial* myMaterial = new SoMaterial;
myMaterial->diffuseColor.setValue( 1.0, 0.0, 0.0 );
root->addChild( myMaterial );
root->addChild( new SoCone );
// Set up viewer:
SoXtExaminerViewer* myViewer = new SoXtExaminerViewer( myWindow );
myViewer->setSceneGraph( root );
myViewer->setTitle( "Examiner Viewer" );
myViewer->show();
SoXt::show( myWindow );
SoXt::mainLoop();
}
C# :
using OIV.Inventor.Nodes;
using OIV.Inventor.Win;
using OIV.Inventor.Win.Viewers;
namespace _02_4_Examiner {
public partial class MainForm : Form
{
SoWinExaminerViewer myViewer;
public MainForm()
{
InitializeComponent();
CreateSample();
}
public void CreateSample()
{
SoSeparator root = new SoSeparator();
SoMaterial myMaterial = new SoMaterial();
myMaterial.diffuseColor.SetValue( 1.0f, 0.0f, 0.0f );
root.AddChild( myMaterial );
root.AddChild( new SoCone() );
// Set up viewer
myViewer = new SoWinExaminerViewer( this, "", true, SoWinFullViewer.BuildFlags.BUILD_ALL, SoWinViewer.Types.BROWSER );
myViewer.SetSceneGraph( root );
myViewer.SetTitle( "Examiner Viewer" );
}
}
} // namespace _02_4_Examiner
Java :
import tools.*;
import java.awt.*;
import com.openinventor.inventor.nodes.*;
import com.openinventor.inventor.awt.*;
public class Main extends DemoInventor
{
public static void main( String[] args )
{
Main applet = new Main();
DemoInventor.isAnApplet = false;
applet.start();
demoMain( applet, "Examiner" );
}
public void
start()
{
super.start();
setLayout( new BorderLayout() );
Panel result = new Panel( new BorderLayout() );
SoSeparator root = new SoSeparator();
root.addChild( new SoCone() );
// Set up viewer
SwSimpleViewer myViewer = new SwSimpleViewer( SwSimpleViewer.EXAMINER );
myViewer.setSceneGraph( root );
result.add( myViewer );
add( result );
}
}
