A camera node generates a picture of everything after it in the scene graph. Typically, you put the camera near the top left of the scene graph, since it must precede the objects you want to view. A scene graph should contain only one active camera, and its position in space is affected by the current geometric transformation.
 A switch node can be used to make one of several cameras active.
SoCamera
Camera nodes are derived from the abstract base class SoCamera (see Camera-Node Classes ).

Camera-Node Classes
SoCamera has the following fields:
| |
| viewportMapping (SoSFEnum) | treatment when the camera's aspect ratio is different from the viewport's aspect ratio. (See Mapping the Camera Aspect Ratio to the Viewport) |
| position (SoSFVec3f) | location of the camera viewpoint. This location is modified by the current geometric transformation. |
| orientation (SoSFRotation) | orientation of the camera's viewing direction. This field describes how the camera is rotated with respect to the default. The default camera looks from (0.0, 0.0, 1.0) toward the origin, and the up direction is (0.0, 1.0, 0.0). This field, along with the current geometric transformation, specifies the orientation of the camera in world space. |
| aspectRatio (SoSFFloat) | ratio of the camera viewing width to height. The value must be greater than 0.0. A few of the predefined camera aspect ratios included in SoCamera.h areSO_ASPECT_SQUARE (1/1) SO_ASPECT_VIDEO (4/3) SO_ASPECT_HDTV (16/9) |
| nearDistance (SoSFFloat) | distance from the camera viewpoint to the near clipping plane. |
| farDistance (SoSFFloat) | distance from the camera viewpoint to the far clipping plane. |
| focalDistance (SoSFFloat) | distance from the camera viewpoint to the point of focus (used by the examiner viewer). |
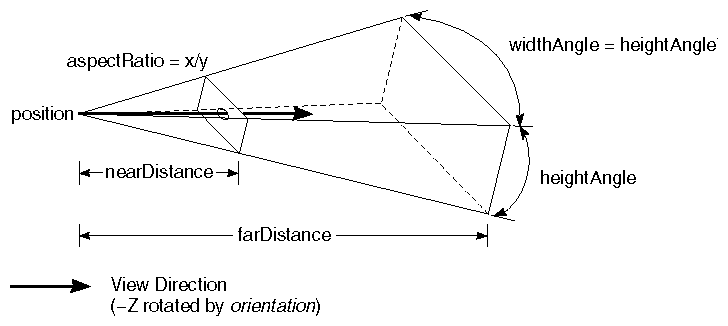
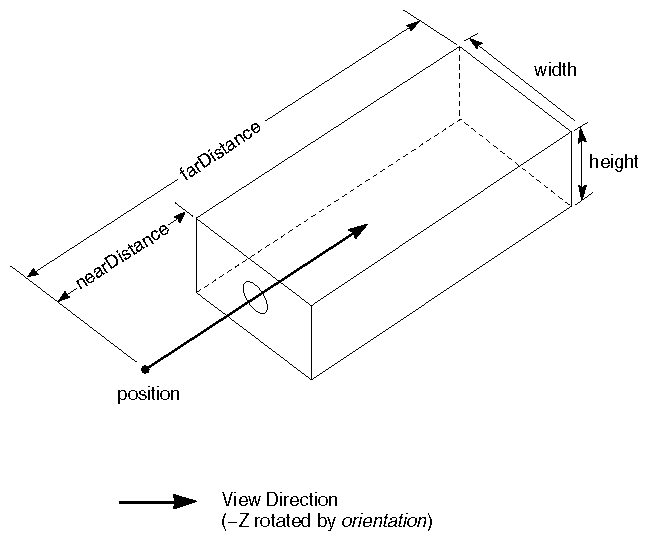
View Volume and Viewing Projection for an SoPerspectiveCamera Node and View Volume and Viewing Projection for an SoOrthographicCamera Node , later in this chapter, show the relationship between the camera position, orientation, near and far clipping planes, and aspect ratio.
When a camera node is encountered during rendering traversal, Inventor performs the following steps:
- During a rendering action, the camera is positioned in the scene (based on its specified position and orientation, which are modified by the current transformation).
- The camera creates a view volume, based on the near and far clipping planes, the aspect ratio, and the height or height angle (depending on the camera type). A view volume, also referred to as a viewing frustum, is a six-sided volume that contains the geometry to be seen (refer to sections on each camera type, later in this chapter, for diagrams showing how the view volume is created). Objects outside of the view volume are clipped, or thrown away.
- The next step is to compress this 3D view volume into a 2D image, similar to the photographic snapshot a camera makes from a real-world scene. This 2D “projection” is now easily mapped to a 2D window on the screen. (Mapping the Camera Aspect Ratio to the Viewport)
- Next, the rest of the scene graph is rendered using the projection created by the camera. You can also use the pointAt() method to replace the value in a camera's orientation field. This method sets the camera's orientation to point toward the specified target point. If possible, it keeps the up direction of the camera parallel to the positive y-axis. Otherwise, it makes the up direction of the camera parallel to the positive z-axis.
The syntax for the pointAt() method is as follows:
C++ :
void pointAt(const SbVec3f& targetPoint)
C# :
void PointAt(SbVec3f targetPoint)
Java :
void pointAt(SbVec3f targetPoint)
Two additional methods for SoCamera are viewAll() and getViewVolume(). The viewAll() method is an easy way to set the camera to view an entire scene graph using the current orientation of the camera. You provide the root node of the scene to be viewed (which usually contains the camera) and a reference to the viewport region used by the render action. The slack parameter is used to position the near and far clipping planes. A slack value of 1.0 (the default) positions the planes for the “tightest fit” around the scene. The syntax for viewAll() is as follows:
C++ :
void viewAll( SoNode* sceneRoot, const SbViewportRegion& vpRegion, float slack = 1.0 )
C# :
void ViewAll( SoNode sceneRoot, SbViewportRegion vpRegion, float slack = 1.0 )
Java :
void viewAll( SoNode sceneRoot, SbViewportRegion vpRegion, float slack )
The viewAll() method modifies the camera position, nearDistance, and farDistance fields. It does not affect the camera orientation. An example showing the use of viewAll() appears in Viewing_a Scene_with_Different_Cameras "Viewing a Scene with Different Cameras".
The getViewVolume() method returns the camera's view volume and is usually used in relation to picking.
Subclasses of SoCamera
The SoCamera class contains two subclasses, as shown in Camera-Node Classes :
SoPerspectiveCamera
A camera of class SoPerspectiveCamera emulates the human eye: objects farther away appear smaller in size. Perspective camera projections are natural in situations where you want to imitate how objects appear to a human observer.
An SoPerspectiveCamera node has one field in addition to those defined in SoCamera :
| |
| heightAngle (SoSFFloat) | specifies the vertical angle in radians of the camera view volume. |
The view volume formed by an SoPerspectiveCamera node is a truncated pyramid, as shown in View Volume and Viewing Projection for an SoPerspectiveCamera Node . The height angle and the aspect ratio determine the width angle as follows:
widthAngle = heightAngle * aspectRatio
SoOrthographicCamera
In contrast to perspective cameras, cameras of class SoOrthographic- Camera produce parallel projections, with no distortions for distance. Orthographic cameras are useful for precise design work, where visual distortions would interfere with exact measurement.
An SoOrthographicCamera node has one field in addition to those defined in SoCamera :
height (SoSFFloat) specifies the height of the camera view volume.
The view volume formed by an SoOrthographicCamera node is a rectangular box, as shown in View Volume and Viewing Projection for an SoOrthographicCamera Node . The height and aspect ratio determine the width of the rectangle:
width = height * aspectRatio
View Volume and Viewing Projection for an SoPerspectiveCamera Node
View Volume and Viewing Projection for an SoOrthographicCamera Node
Mapping the Camera Aspect Ratio to the Viewport
A viewport is the rectangular area where a scene is rendered. By default, the viewport has the same dimensions as the window (SoXtRenderArea). The viewport is specified when the SoGLRenderAction is constructed (see Applying Actions).
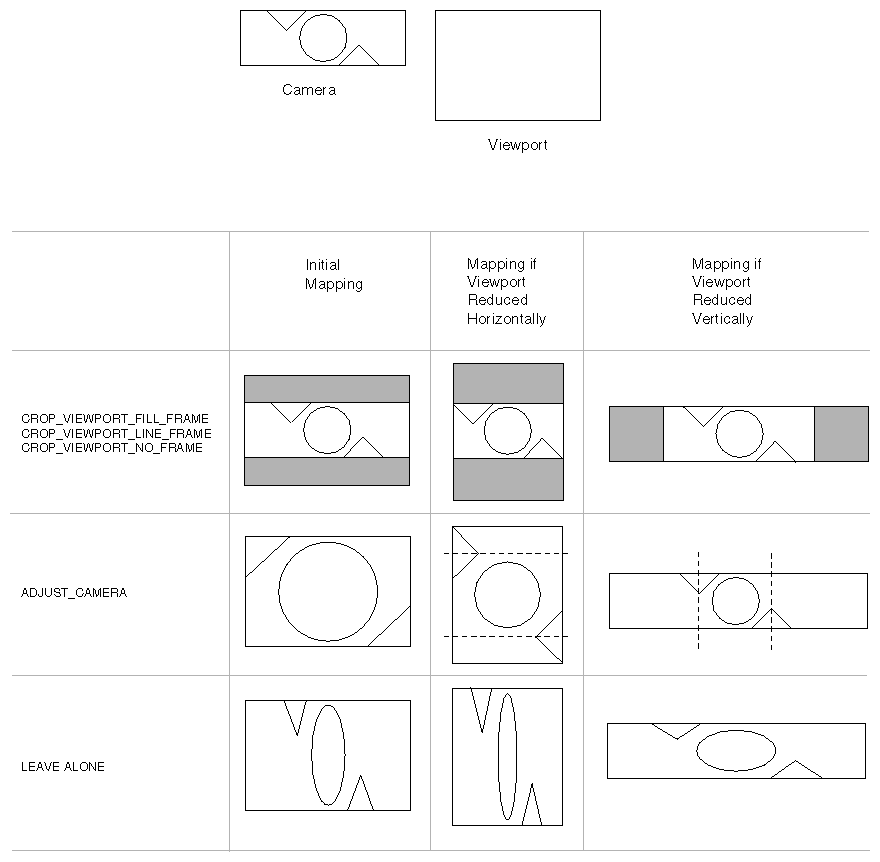
The viewportMapping field of SoCamera allows you to specify how to map the camera projection into the viewport when the aspect ratios of the camera and viewport differ. The first three choices crop the viewport to fit the camera projection. The advantage to these settings is that the camera aspect ratio remains unchanged. (The disadvantage is that there is dead space in the viewport.)
- CROP_VIEWPORT_FILL_FRAME adjusts the viewport to fit the camera (see Mapping the Camera Aspect Ratio to the Viewport ). It draws the viewport with the appropriate aspect ratio and fills in the unused space with gray.
- CROP_VIEWPORT_LINE_FRAME adjusts the viewport to fit the camera. It draws the border of the viewport as a line.
- CROP_VIEWPORT_NO_FRAME adjusts the viewport to fit the camera. It does not indicate the viewport boundaries. These two choices adjust the camera projection to fit the viewport:
- ADJUST_CAMERA adjusts the camera to fit the viewport (see Mapping the Camera Aspect Ratio to the Viewport ). The projected image is not distorted. (The actual values stored in the aspectRatio and height / heightAngle fields are not changed. These values are temporarily overridden if required by the viewport mapping.) This is the default setting.
- LEAVE_ALONE does not modify anything. The camera image is resized to fit the viewport. A distorted image is produced (see Mapping the Camera Aspect Ratio to the Viewport ). Mapping the Camera Aspect Ratio to the Viewport shows the different types of viewport mapping. In this example, the camera aspect ratio is 3 to 1 and the viewport aspect ratio is 1.5 to 1. The top camera uses CROP_VIEWPORT_FILL_FRAME viewport mapping. The center camera uses ADJUST_CAMERA. The bottom camera uses LEAVE_ALONE. Mapping the Camera Aspect Ratio to the Viewport also shows three stages of mapping. At the left is the initial viewport mapping. The center column of drawings shows how the mapping changes if the viewport is compressed horizontally. The right-hand column shows how the mapping changes if the viewport is compressed vertically.
Scene_with_Different_Cameras
Viewing a Scene with Different Cameras
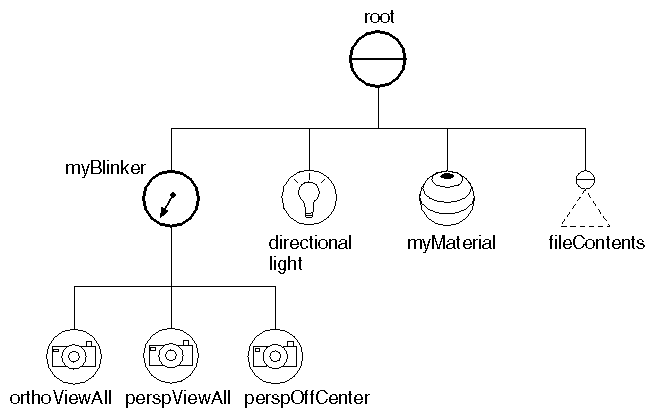
Switching among Multiple Cameras shows a scene viewed by an orthographic camera and two perspective cameras in different positions. It uses a blinker node (described in Engines) to switch among the three cameras. The scene (a park bench) is read from a file. Scene Graph for Camera Example shows the scene graph created by this example. Camera Example shows the image created by this example.
Mapping the Camera Aspect Ratio to the Viewport
Scene Graph for Camera Example
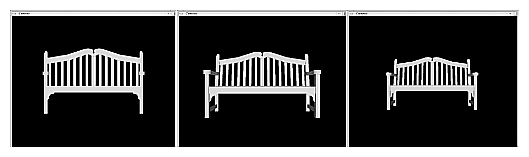
Camera Example
Example : Switching among Multiple Cameras
C++ :
#include <Inventor/SbLinear.h>
#include <Inventor/SoDB.h>
#include <Inventor/SoInput.h>
#include <Inventor/Xt/SoXt.h>
#include <Inventor/Xt/SoXtRenderArea.h>
#include <Inventor/nodes/SoBlinker.h>
#include <Inventor/nodes/SoDirectionalLight.h>
#include <Inventor/nodes/SoMaterial.h>
#include <Inventor/nodes/SoOrthographicCamera.h>
#include <Inventor/nodes/SoPerspectiveCamera.h>
#include <Inventor/nodes/SoSeparator.h>
#include <Inventor/nodes/SoTransform.h>
main( int, char** argv )
{
// Initialize Inventor and Xt
Widget myWindow = SoXt::init( argv[0] );
if ( myWindow == NULL )
exit( 1 );
SoSeparator* root = new SoSeparator;
root->ref();
// Create a blinker node and put it in the scene. A blinker
// switches between its children at timed intervals.
SoBlinker* myBlinker = new SoBlinker;
root->addChild( myBlinker );
// Create three cameras. Their positions will be set later.
// This is because the viewAll method depends on the size
// of the render area, which has not been created yet.
SoOrthographicCamera* orthoViewAll = new SoOrthographicCamera;
SoPerspectiveCamera* perspViewAll = new SoPerspectiveCamera;
SoPerspectiveCamera* perspOffCenter = new SoPerspectiveCamera;
myBlinker->addChild( orthoViewAll );
myBlinker->addChild( perspViewAll );
myBlinker->addChild( perspOffCenter );
// Create a light
root->addChild( new SoDirectionalLight );
// Read the object from a file and add to the scene
SoInput myInput;
if ( !myInput.openFile( "parkbench.iv" ) )
return 1;
SoSeparator* fileContents = SoDB::readAll( &myInput );
if ( fileContents == NULL )
return 1;
SoMaterial* myMaterial = new SoMaterial;
myMaterial->diffuseColor.setValue( 0.8, 0.23, 0.03 );
root->addChild( myMaterial );
root->addChild( fileContents );
SoXtRenderArea* myRenderArea = new SoXtRenderArea( myWindow );
// Establish camera positions.
// First do a viewAll() on all three cameras.
// Then modify the position of the off-center camera.
SbViewportRegion myRegion( myRenderArea->getSize() );
orthoViewAll->viewAll( root, myRegion );
perspViewAll->viewAll( root, myRegion );
perspOffCenter->viewAll( root, myRegion );
SbVec3f initialPos;
initialPos = perspOffCenter->position.getValue();
float x, y, z;
initialPos.getValue( x, y, z );
perspOffCenter->position.setValue( x + x / 2., y + y / 2., z + z / 4. );
myRenderArea->setSceneGraph( root );
myRenderArea->setTitle( "Cameras" );
myRenderArea->show();
SoXt::show( myWindow );
SoXt::mainLoop();
}
C# :
using System.Windows.Forms;
using OIV.Inventor.Nodes;
using OIV.Inventor.Win;
using OIV.Inventor;
namespace _04_1_Cameras
{
public partial class MainForm : Form
{
SoWinRenderArea myRenderArea;
public MainForm()
{
InitializeComponent();
CreateSample();
}
public void CreateSample()
{
SoSeparator root = new SoSeparator();
// Create a blinker node and put it in the scene. A blinker
// switches between its children at timed intervals.
SoBlinker myBlinker = new SoBlinker();
root.AddChild( myBlinker );
// Create three cameras. Their positions will be set later.
// This is because the viewAll method depends on the size
// of the render area, which has not been created yet.
SoOrthographicCamera orthoViewAll = new SoOrthographicCamera();
SoPerspectiveCamera perspViewAll = new SoPerspectiveCamera();
SoPerspectiveCamera perspOffCenter = new SoPerspectiveCamera();
myBlinker.AddChild( orthoViewAll );
myBlinker.AddChild( perspViewAll );
myBlinker.AddChild( perspOffCenter );
// Create a light
root.AddChild( new SoDirectionalLight() );
// Read the object from a file and add to the scene
SoInput myInput = new SoInput();
myInput.OpenFile( "../../../../../data/parkbench.iv" );
SoSeparator fileContents = SoDB.ReadAll( myInput );
SoMaterial myMaterial = new SoMaterial();
myMaterial.diffuseColor.SetValue( 0.8f, 0.23f, 0.03f );
root.AddChild( myMaterial );
root.AddChild( fileContents );
myRenderArea = new SoWinRenderArea( this, "", true, true, true );
// Establish camera positions.
// First do a viewAll on all three cameras.
// Then modify the position of the off-center camera.
SbViewportRegion myRegion = new SbViewportRegion( myRenderArea.GetSize() );
orthoViewAll.ViewAll( root, myRegion );
perspViewAll.ViewAll( root, myRegion );
perspOffCenter.ViewAll( root, myRegion );
SbVec3f initialPos;
initialPos = perspOffCenter.position.Value;
float x, y, z;
initialPos.GetValue( out x, out y, out z );
perspOffCenter.position.SetValue( x + x / 2.0f, y + y / 2.0f, z + z / 4.0f );
myRenderArea.SetSceneGraph( root );
myRenderArea.SetTitle( "Cameras" );
}
}
} // namespace _04_1_Cameras
Java :
package inventor.mentor.cameras;
import tools.*;
import java.awt.*;
import com.openinventor.inventor.*;
import com.openinventor.inventor.nodes.*;
import com.openinventor.inventor.awt.*;
public class Main extends DemoInventor
{
public void start()
{
super.start();
setLayout( new BorderLayout() );
Panel panel = new Panel( new BorderLayout() );
// Create a blinker node and put it in the scene. A blinker
// switches between its children at timed intervals.
SoBlinker myBlinker = new SoBlinker();
// Create three cameras. Their positions will be set later.
// This is because the viewAll method depends on the size
// of the render area, which has not been created yet.
SoOrthographicCamera orthoViewAll = new SoOrthographicCamera();
SoPerspectiveCamera perspViewAll = new SoPerspectiveCamera();
SoPerspectiveCamera perspOffCenter = new SoPerspectiveCamera();
myBlinker.addChild( orthoViewAll );
myBlinker.addChild( perspViewAll );
myBlinker.addChild( perspOffCenter );
// Read the object from a String
SoInput myInput = new SoInput();
myInput.openFile( "../../../../data/models/parkbench.iv" );
SoSeparator fileContents = SoDB.readAll( myInput );
SoMaterial myMaterial = new SoMaterial();
myMaterial.diffuseColor.setValue( 0.8F, 0.23F, 0.03F );
SoSeparator root = new SoSeparator();
{ // assemble scene graph
root.addChild( myBlinker );
// Create a light
root.addChild( new SoDirectionalLight() );
root.addChild( myMaterial );
root.addChild( fileContents );
}
SwRenderArea myRenderArea = new SwRenderArea();
// Establish camera positions.
// First do a viewAll on all three cameras.
// Then modify the position of the off-center camera.
SbViewportRegion myRegion = new SbViewportRegion( myRenderArea.getSize() );
orthoViewAll.viewAll( root, myRegion );
perspViewAll.viewAll( root, myRegion );
perspOffCenter.viewAll( root, myRegion );
SbVec3f initialPos = new SbVec3f();
initialPos = perspOffCenter.position.getValue();
float vec[];
vec = initialPos.getValue();
perspOffCenter.position.setValue( vec[0] + vec[0] / 2, vec[1] + vec[1] / 2, vec[2] + vec[2] / 4 );
myRenderArea.setSize( 400, 400 );
myRenderArea.setSceneGraph( root );
panel.add( myRenderArea );
add( panel );
}
public static void main( String[] argv )
{
Main applet = new Main();
DemoInventor.isAnApplet = false;
applet.start();
demoMain( applet, "Cameras" );
}
}
After you view this example, experiment by modifying the fields in each camera node to see how changes in camera position, orientation, aspect ratio, location of clipping planes, and camera height (or height angle) affect the UserGuide_Images on your screen. Then try using the pointAt() method to modify the orientation of the camera node. Remember that a scene graph includes only one active camera at a time, and it must be placed before the objects to be viewed.
PoView / PoSceneView
