With the default lighting model (Phong), a scene graph also needs at least one light before you can view its objects. During a rendering action, traversing a light node in the scene graph turns that light on. The position of the light node in the scene graph determines two things:
What the light illuminates—a light illuminates everything that follows it in the scene graph. (The light is part of the traversal state, described in Chapter 3, Nodes and Groups. Use an SoSeparator( C++ | Java | .NET ) node to isolate the effects of a particular light from the rest of the scene graph.)
Where the light is located in 3D space—certain light-source nodes (for example, SoPointLight( C++ | Java | .NET )) have a location field. This light location is affected by the current geometric transformation. Other light-source nodes have a specified direction (for example, SoDirectionalLight( C++ | Java | .NET )), which is also affected by the current geometric transformation.
Another important fact about all light-source nodes is that lights accumulate. Each time you add a light to the scene graph, the scene appears brighter. The maximum number of active lights is dependent on the OpenGL implementation.
(Advanced) In some cases, you may want to separate the position of the light in the scene graph from what it illuminates. Example 4-2 uses the SoTransformSeparator( C++ | Java | .NET ) node to move only the position of the light. Sensors and engines are also a useful way to affect a light's behavior. For example, you can attach a sensor to a sphere object; when the sphere position changes, the sensor can change the light position as well. Or, you can use an engine that finds the path to a given object to affect the location of the light that illuminates that object (see SoComputeBoundingBox( C++ | Java | .NET ) in the Open Inventor C++ Reference Manual).
All lights are derived from the abstract base class SoLight( C++ | Java | .NET ). This class adds no new methods to SoNode( C++ | Java | .NET ). Its fields are as follows:
The SoLight( C++ | Java | .NET ) class contains three subclasses, as shown in Figure 4.7, “ Light-Node Classes ”:
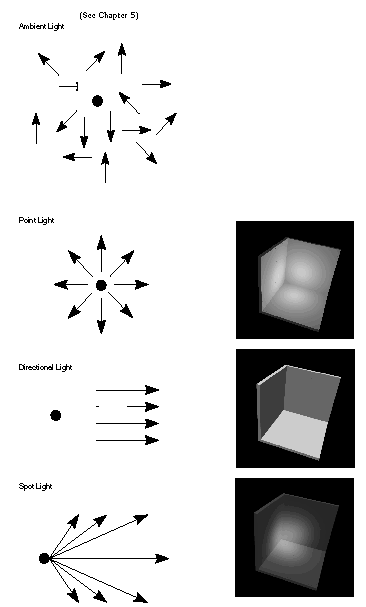
Figure 4.8, “ Light Types ” shows the effects of each of these light types. The left side of the figure shows the direction of the light rays, and the right side shows the same scene rendered with each light type. Figure B.1, “ Plate 1 ”, Figure B.2, “ Plate 2 ” and Figure B.3, “ Plate 3 ” show additional use of these light types.
A light of class SoPointLight( C++ | Java | .NET ), like a star, radiates light equally in all directions from a given location in 3D space. An SoPointLight( C++ | Java | .NET ) node has one additional field:
A light of class SoDirectionalLight( C++ | Java | .NET ) illuminates uniformly along a particular direction. Since it is infinitely far away, it has no location in 3D space. An SoDirectionalLight( C++ | Java | .NET ) node has one additional field:
specifies the direction of the rays from a directional light source. (This direction is affected by the current geometric transformation.) |
![[Tip]](../images/tip.jpg) | |
Tip: A surface composed of a single polygon (such as a large rectangle) with one normal at each corner will not show the effects of a point light source, since lighting is computed (by OpenGL) only at vertices. Use a more complex surface to show this effect. |
With an SoDirectionalLight( C++ | Java | .NET ) source node, all rays of incident light are parallel. They are reflected equally from all points on a flat polygon, resulting in flat lighting of equal intensity, as shown in Figure 4.8, “ Light Types ”. In contrast, the intensity of light from an SoPointLight( C++ | Java | .NET ) source on a flat surface would vary, because the angle between the surface normal and the incident ray of light is different at different points of the surface.
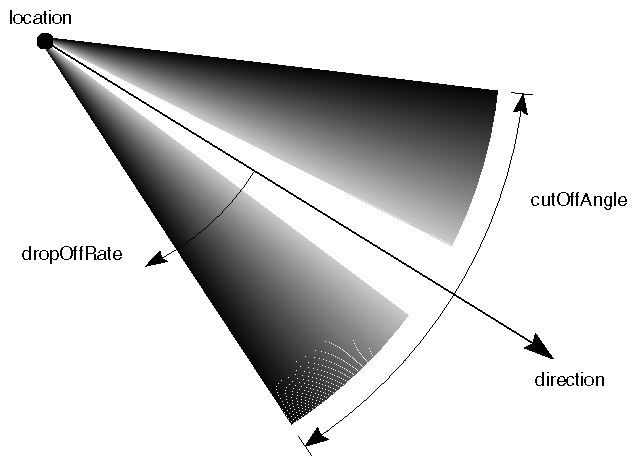
A light of class SoSpotLight( C++ | Java | .NET ) illuminates from a point in space along a primary direction. Like a theatrical spotlight, its illumination is a cone of light diverging from the light's position. An SoSpotLight( C++ | Java | .NET ) node has four additional fields (see Figure 4.9, “ Fields for SoSpotLight Node ”):
3D location of a spotlight source. (This location is affected by the current geometric transformation.) | |
primary direction of the illumination. | |
rate at which the light intensity drops off from the primary direction (0.0 = constant intensity, 1.0 = sharpest drop-off). | |
angle, in radians, outside of which the light intensity is 0.0. This angle is measured from one edge of the cone to the other. |
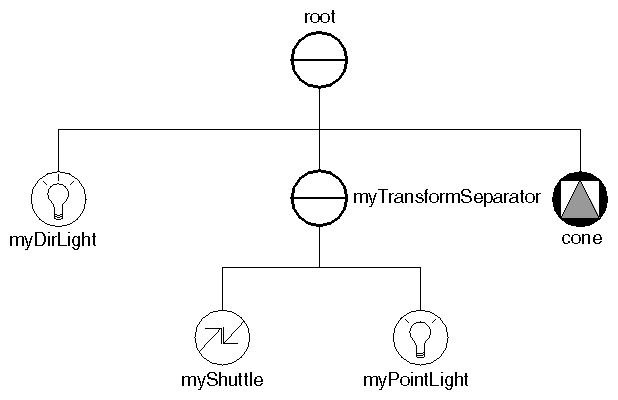
You can now experiment by adding different lights to a scene. Example 4.2, “ Using Different Types of Lights ” contains two light sources: a stationary red directional light and a green point light that is moved back and forth by an SoShuttle( C++ | Java | .NET ) node (see Chapter 15, Engines). Figure 4.10, “ Scene Graph for Light Example ” shows the scene graph created by this example.
Example 4.2. Using Different Types of Lights
C++
#include <Inventor/SoDB.h>
#include <Inventor/Xt/SoXt.h>
#include <Inventor/Xt/viewers/SoXtExaminerViewer.h>
#include <Inventor/nodes/SoCone.h>
#include <Inventor/nodes/SoDirectionalLight.h>
#include <Inventor/nodes/SoMaterial.h>
#include <Inventor/nodes/SoPointLight.h>
#include <Inventor/nodes/SoSeparator.h>
#include <Inventor/nodes/SoShuttle.h>
#include <Inventor/nodes/SoTransformSeparator.h>

main(int , char **argv)
{
   // Initialize Inventor and Xt
   Widget myWindow = SoXt::init(argv[0]);
   if (myWindow == NULL)
      exit(1);

   SoSeparator *root = new SoSeparator;
   root->ref();

   // Add a directional light
   SoDirectionalLight *myDirLight = new SoDirectionalLight;
   myDirLight->direction.setValue(0, -1, -1);
   myDirLight->color.setValue(1, 0, 0);
   root->addChild(myDirLight);

   // Put the shuttle and the light below a transform separator.
   // A transform separator pushes and pops the transformation
   // just like a separator node, but other aspects of the state
   // are not pushed and popped. So the shuttle's translation
   // will affect only the light. But the light will shine on
   // the rest of the scene.
   SoTransformSeparator *myTransformSeparator =
       new SoTransformSeparator;
   root->addChild(myTransformSeparator);

   // A shuttle node translates back and forth between the two
   // fields translation0 and translation1.
   // This moves the light.
   SoShuttle *myShuttle = new SoShuttle;
   myTransformSeparator->addChild(myShuttle);
   myShuttle->translation0.setValue(-2, -1, 3);
   myShuttle->translation1.setValue( 1,  2, -3);

   // Add the point light below the transformSeparator
   SoPointLight *myPointLight = new SoPointLight;
   myTransformSeparator->addChild(myPointLight);
   myPointLight->color.setValue(0, 1, 0);
.NET
using System.Windows.Forms;

using OIV.Inventor.Nodes;
using OIV.Inventor.Win.Viewers;

namespace _04_2_Lights
{
  public partial class MainForm : Form
  {
    SoWinExaminerViewer myViewer;

    public MainForm()
    {
      InitializeComponent();
      CreateSample();
    }

    public void CreateSample()
    {
      SoSeparator root = new SoSeparator();

      // Add a directional light
      SoDirectionalLight myDirLight = new SoDirectionalLight();
      myDirLight.direction.SetValue(0, -1, -1);
      myDirLight.color.SetValue(1, 0, 0);
      root.AddChild(myDirLight);

      // Put the shuttle and the light below a transform separator.
      // A transform separator pushes and pops the transformation
      // just like a separator node, but other aspects of the state
      // are not pushed and popped. So the shuttle's translation
      // will affect only the light. But the light will shine on
      // the rest of the scene.
      SoTransformSeparator myTransformSeparator = new SoTransformSeparator();
      root.AddChild(myTransformSeparator);

      // A shuttle node translates back and forth between the two
      // fields translation0 and translation1.
      // This moves the light.
      SoShuttle myShuttle = new SoShuttle();
      myTransformSeparator.AddChild(myShuttle);
      myShuttle.translation0.SetValue(-2, -1, 3);
      myShuttle.translation1.SetValue(1, 2, -3);

      // Add the point light below the transformSeparator
      SoPointLight myPointLight = new SoPointLight();
      myTransformSeparator.AddChild(myPointLight);
      myPointLight.color.SetValue(0, 1, 0);

      root.AddChild(new SoCone());

      myViewer = new SoWinExaminerViewer(this, "", true,
          SoWinFullViewer.BuildFlags.BUILD_ALL, SoWinViewer.Types.BROWSER);
      myViewer.SetSceneGraph(root);
      myViewer.SetTitle("Lights");
      myViewer.SetHeadlight(false);
    }
  }
}
Java
package inventor.mentor.lights;

import tools.*;
import com.openinventor.inventor.nodes.*;
import com.openinventor.inventor.awt.*;
import java.awt.*;

public class Main extends DemoInventor
{

  public static void main(String[] args)
  {
    Main applet = new Main();
    DemoInventor.isAnApplet = false;
    applet.start();
    demoMain(applet, "Lights");
  }

  public void start()
  {
    super.start();

    // Add a directional light
    SoDirectionalLight myDirLight = new SoDirectionalLight();
    myDirLight.direction.setValue(0, -1, -1);
    myDirLight.color.setValue(1, 0, 0);

    // Put the shuttle and the light below a transform separator.
    // A transform separator pushes and pops the transformation
    // just like a separator node, but other aspects of the state
    // are not pushed and popped. So the shuttle's translation
    // will affect only the light. But the light will shine on
    // the rest of the scene.
    SoTransformSeparator myTransformSeparator = new SoTransformSeparator();

    // A shuttle node translates back and forth between the two
    // fields translation0 and translation1.
    // This moves the light.
    SoShuttle myShuttle = new SoShuttle();
    myTransformSeparator.addChild(myShuttle);
    myShuttle.translation0.setValue(-2, -1, 3);
    myShuttle.translation1.setValue(1, 2, -3);

    // Add the point light below the transformSeparator
    SoPointLight myPointLight = new SoPointLight();
    myTransformSeparator.addChild(myPointLight);
    myPointLight.color.setValue(0, 1, 0);
C++
   root->addChild(new SoCone);

   SoXtExaminerViewer *myViewer =
            new SoXtExaminerViewer(myWindow);
   myViewer->setSceneGraph(root);
   myViewer->setTitle("Lights");
   myViewer->setHeadlight(FALSE);
   myViewer->show();

   SoXt::show(myWindow);
   SoXt::mainLoop();
}
.NET
            root.AddChild(new SoCone());

            myViewer = new SoWinExaminerViewer(this, "", true,
                SoWinFullViewer.BuildFlags.BUILD_ALL, SoWinViewer.Types.BROWSER);
            myViewer.SetSceneGraph(root);
            myViewer.SetTitle("Lights");
            myViewer.SetHeadlight(false);
        }
    }
}
Java
    SoSeparator root = new SoSeparator();
    { // Assemble scene graph
      root.addChild(myDirLight);
      root.addChild(myTransformSeparator);
      root.addChild(new SoCone());
    }

    SwSimpleViewer myViewer = new SwSimpleViewer();
    myViewer.setSceneGraph(root);

    setLayout(new BorderLayout());
    add(myViewer, BorderLayout.CENTER);
  }
}


