Inventor provides programming support at a variety of levels. At the end-user interface level, Inventor offers a unified look and feel for 3D graphics interfaces. At the programming level, the Inventor toolkit (shown previously in Figure 1.1, “ Inventor Architecture ”) offers the following tools, which are explained in greater detail later in this chapter:
A 3D scene database that includes shape, property, group, engine, and sensor objects, used to create a hierarchical 3D scene
A set of node kits that provide a convenient mechanism for creating prebuilt groupings of Inventor nodes
A set of manipulators, including the handle box and trackball, which are objects in a scene database that the user can interact with directly
An Inventor Component Library for Xt, including a render area (a window used for rendering), material editor, viewers, and utility functions, used to provide some high-level interactive tasks
This book explains Open Inventor from the bottom up, starting with the 3D scene database.
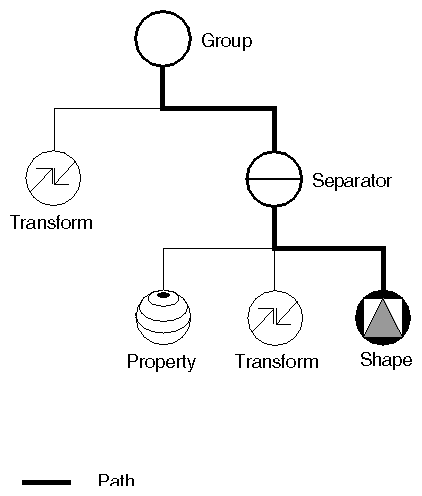
The node is the basic building block used to create three-dimensional scene databases in Inventor. Each node holds a piece of information, such as a surface material, shape description, geometric transformation, light, or camera. All 3D shapes, attributes, cameras, and light sources present in a scene are represented as nodes.
An ordered collection of nodes is referred to as a scene graph. (Figure 1.3, “ Example of a Scene Graph ” shows a simple scene graph. Figure 1, “ Scene Graph Symbols ”, in “About This Book,” has the key to the icons used in scene graph diagrams throughout this book.) This scene graph is stored in the Inventor database. Inventor takes care of storing and managing the scene graph in the database. The database can contain more than one scene graph.
After you have constructed a scene graph, you can apply a number of operations or actions to it, including rendering, picking, searching, computing a bounding box, and writing to a file.
Classes of database primitives include shape nodes (for example, sphere, cube, cylinder, quad mesh), property nodes (for example, material, lighting model, textures, environment), and group nodes (for example, separator, level-of-detail, and switch). Other special database primitives are engines and sensors. Engines are objects that can be connected to other objects in the scene graph and used to animate parts of the scene or constrain certain parts of the scene in relation to other parts (see Chapter 15, Engines). A sensor is an object that detects when something in the database changes and calls a function supplied by the application. Sensors can respond to specified timing requirements (for example, “Do this every n seconds”) or to changes in the scene graph data (see Chapter 14, Sensors).
Node kits facilitate the creation of structured, consistent databases. Each node kit is a collection of nodes with a specified arrangement. A template associated with the node kit determines which nodes can be added when necessary and where they should be placed. For example, the SoShapeKit node kit is used for any Inventor shape object. If you use this node kit, you don't have to create and arrange each node individually. By default, the template for the SoShapeKit( C++ | Java | .NET ) contains an SoCube( C++ | Java | .NET ) node, and it allows a material, geometric transformation, and other properties to be inserted in the correct place when required.
Another use of node kits is to define application-specific objects and semantics. For example, a flight-simulation package might include a variety of objects representing airplanes. Each of these airplanes consists of the same general scene graph structure—for example, fuselage, wings, and landing gear—as well as some airplane-specific methods—for example, bankLeft(), raiseLandingGear(). To an application writer using this package, each type of airplane can be dealt with in a similar way. There is no need to know the details of the structure of the subgraph representing the landing gear to raise it, since the general method, raiseLandingGear(), exists. Creating these new objects and methods requires extending Open Inventor by subclassing, which is described in The Inventor Toolmaker. It is highly recommended that you use some form of node kits in your application to maintain order and policy.
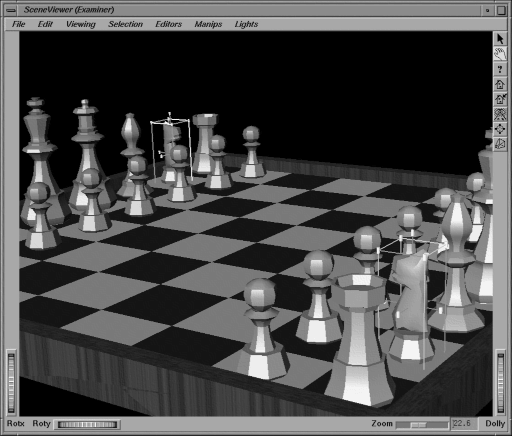
A manipulator is a special kind of node that reacts to user interface events and can be edited directly by the user. Manipulators typically have parts that render in the scene and provide a means for translating events into changes to the database. An example of a manipulator is the handle box, which is a bounding box of another object with handles at the corners and sides. In Figure 1.4, “ Handle-Box Manipulator ”, handle boxes surround the knights. By picking on a handle and dragging it, the user can change the scale or position of the box and thus the object inside it. Manipulators provide an easy way for applications to incorporate direct 3D interaction.