Table of Contents
- What is RemoteViz?
- Basic Concepts
- Getting Started with RemoteViz API (HelloCone)
- Client - Web Viewer
- Build and Run the Example
- Demo in Docker
- User Interaction
- Client-Service Communication
- Frames Encoding
- Secure Connection
RemoteViz --- Image Streaming API for the Cloud
RemoteViz is an image streaming toolkit. RemoteViz enables true web-based 2D/3D visualization that runs on a server and displays in the user's web browser. As images are rendered by the visualization software, RemoteViz streams them to the browser, using video encoding algorithms (H.264, VP9) to minimize required bandwidth, and GPU accelerated encoding to maximize performance. Remote desktop technologies can be used to "lift and shift" an existing desktop application into the Cloud, but that solution has many limitations. RemoteViz is designed to support visualization as a microservice in a modern web-based application. RemoteViz has many features but primarily solves three key problems.
First, to be interactive, a visualization service like a 3D viewer must deliver at least twenty images per second to the user's machine and each image may contain millions of pixels. That's a lot of data. RemoteViz manages the encoding and transmission of images to minimize bandwidth, maximize frame rate, and maintain image quality. Video encoding formats like H.264 and VP9 can dramatically reduce the bandwidth requirements. And using GPU acceleration can optimize performance, both for encoding (on the server-side) and for decoding (on the browser-side) the image stream. RemoteViz has no minimum bandwidth requirement and can adapt to the current network conditions by prioritizing either the image quality or the frame rate.
Second, modern web-based applications want to display directly in the user's web browser. RemoteViz does not require any client software to be installed, just a small block of JavaScript that is downloaded as part of the web page HTML. One or more RemoteViz display areas can be defined on a single page and can be integrated with any user interface framework. The RemoteViz JavaScript object can automatically send user input events back to the visualization service and it can also exchange application defined messages with the service. RemoteViz uses the browser's native support for video formats to take advantage of local decoding acceleration. The image stream can be displayed on almost any local device (workstation, laptop, tablet or phone) as long as the browser supports HTML5.
Third, and finally, RemoteViz allows web-based visualization applications to take full advantage of Cloud-native services. RemoteViz can be used, for example, to quickly implement a 3D viewer as a standalone web-based application. But RemoteViz is really designed to integrate visualization into a web-based application using a modern microservice architecture. For example, we provide examples showing how to integrate a RemoteViz visualization service with commonly used services like authentication and load-balancing. A RemoteViz service can be deployed in a public or private Cloud or on-premises. RemoteViz is compatible with Docker, Kubernetes, and other tools.
Why would you use RemoteViz
As described in the previous section, we believe RemoteViz is the best solution because it enables the implementation of a Cloud-native application on the server-side, provides state of the art image streaming between the server and browser, and integrates with the local user interface on the browser side.
But first, you might ask: Why implement a visualization application as a Cloud-native service using server-side rendering and image streaming? There are many general reasons for implementing an application in the Cloud, such as Cloud-native services, scalable resources, global access, and easy updating of application code. We don’t need to repeat those here. There are also specific reasons for using server-side rendering.
Number one is data. To use a local rendering solution, some portion of your application’s data must be transferred to the user’s machine. with server-side rendering, your data stays in the Cloud. Only rendered images are transferred to the user’s machine. Many applications need to keep data on the server for security. Medical applications generally need to keep data on the server for privacy. Oil and gas applications generally need to keep data on the server because of the size. A single seismic volume may be hundreds of gigabytes or even a terabyte of data. Keeping one copy of the data in the Cloud allows users to share while reducing storage expense and time-consuming copies. Data stored in the Cloud can be efficiently streamed to the services that need it using high speed networks. Visualization libraries, like Open Inventor, are designed for this scenario. Using "tiled" data storage, Open Inventor allows random access to any part of a large volume data set and automatically computes the data blocks needed to render the best possible image based on the server hardware, camera position, image size, and other factors.
Number two is hardware capability. When you use a local rendering solution, the application is limited to the CPU, GPU, and memory resources on the user’s machine. Local rendering can be a good solution for applications with small data sets and relatively simple rendering requirements. For applications with larger data sets, the memory on the local machine may limit the amount of data that can be rendered or prevent the user from using full resolution data. For applications that require more complex rendering, like volume ray-casting, the GPU on the local machine may limit the image quality or even prevent the user from using some features. Using server-side rendering with RemoteViz streaming, users can view and interact with their data on almost any device. On the server-side, the application or the user can decide what kind of hardware instance to use. Users can have the capacity and rendering quality of a high-end workstation without the acquisition and maintenance costs.
RemoteViz image streaming works with any visualization library. As an initial step in the migration to the Cloud, some customers have even ported their existing applications to use as a "head-less" render engine. Commands from the local user interface are passed to the render engine and RemoteViz is used to stream the rendered images to the user’s browser. However, it is worth noting that the Open Inventor visualization library includes a highly optimized integration of RemoteViz streaming. For example, using Open Inventor, it is not necessary to upload each rendered image from the GPU before compression and encoding can be done. Using Open Inventor, RemoteViz is able to compress each rendered image on the GPU and only upload the resulting, much smaller, block of data. Open Inventor is also a powerful visualization and image processing library with many features specifically designed to increase the value of oil&gas and medical applications.
About This Guide
This guide is intended to walk you through creating your first basic RemoteViz application. It will not make you a RemoteViz expert or teach you how to write and deploy a real web application. However, we mention some "next steps" topics and provide links to more information about using RemoteViz.
As a prerequisite for this guide, we expect that you are familiar with C++, Open Inventor programming, and have a basic understanding of JavaScript. You don’t need advanced web development experience. You can run and test the example program on your local machine. You do not need access to the Cloud. Although the example code is in C++, RemoteViz is available for .NET (C#) and Java. The code will be very similar.
Even though we use the Open Inventor library to provide visualization for our example program, RemoteViz can be used with any visualization library.
Note: The example code assumes that you are using Open Inventor version 10.6 or higher. RemoteViz is available for older versions but there will be some differences in the method signatures.
Basic Concepts
There are three components of a RemoteViz application: the service, the client, and a web server. The RemoteViz Service is basically an Open Inventor application with no viewer that runs on the server-side. It is in charge of data access, computing, and rendering. It renders the scene and sends it to the client via a web-socket connection. In most cases, RemoteViz Client is a web browser page hosting a render area. The client accepts the images and displays them on a render area. The client also captures the user input events and sends it to the service to be handled as Open Inventor events. In a production environment, a web-server hosts the client and manages web-socket communication between the client and the server.
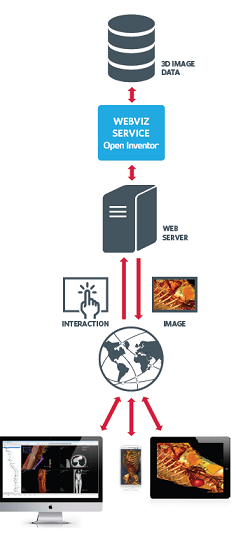 |
1. Service is in charge of executing the Open Inventor code - Interprets events from the client - Renders the scene using Open Inventor - Sends images to the client 2. Web Server serves the web-page containing the render area 3. Client receives images and displays them |
A RemoteViz application, by default, runs in Inventor Service mode and uses Open Inventor render engine. However, you may use your own render engine in a RemoteViz application by using the Independent Service run mode.
Getting Started with RemoteViz
In this section, you will learn the basics of programming using the RemoteViz API. We will walk through how to create a simple rendering service. We will then implement listener classes to handle notifications from the service and the render area.
This guide basically implements the "HelloCone" RemoteViz example program. You can find it in the $(OIVHOME)/examples/source/RemoteViz directory.
Main
First, include the header files for Service, ServiceSettings, and ServiceListener classes.
#include <RemoteViz/Rendering/Service.h>
#include <RemoteViz/Rendering/ServiceSettings.h>
Now add the following using statement before the main function. Note that all RemoteViz classes are defined inside a namespace, so the using directive allows RemoteViz classes to be more conveniently used without RemoteViz::Rendering as an explicit qualifier.
using RemoteViz::Rendering;
In the main( ) function, define settings such as IP address and port number of the rendering service.
// Use localhost address for service IP address
std::string serviceIPaddress = "127.0.0.1";
// Default value for service port
unsigned short servicePort = 8080;
If the service IP and port number are passed as command line arguments, then you need to access the values from argument vector (argv).
// Use passed values for the service IP address and port
if (argc == 3)
{
  serviceIPaddress = argv[1];
  servicePort = atoi(argv[2]);
}
Service Settings
Next, you have to create an instance of RemoteViz::Rendering::ServiceSettings to set the properties of rendering service.
// Instantiate a service settings class
auto settings = std::make_shared<ServiceSettings>();
// Set the IP address used by the service
settings->setIP(serviceIPaddress);
// Set the port used by the service
settings->setPort(servicePort);
The RemoteViz::Rendering::Service class defines the rendering service. This class uses the singleton pattern to restrict its instantiation to a single unique object in the program, so there can only be one service per executable.
Use the method Service::instance() to access the service object.
Usually, you will attach a listener to the service object before using it. The listener receives notifications from the rendering service and responds accordingly. (More on the ServiceListener and HelloConeServiceListener classes in the next section.)
// Create an object of ServiceListener class to manage the service events
auto serviceListener = std::make_shared<HelloConeServiceListener>();
// Attach serviceListener to the service
Service::instance()->addListener(serviceListener);
Before using the service, you must first open it with Service::open(). You can then start the service by calling Service::dispatch() in a continuous loop until interrupted. The dispatch() method processes all RemoteViz events.
// Open the service by using the settings
if (Service::instance()->open(settings))
{
  ...
  // Main loop
  while(running)
  {
    Service::instance()->dispatch();
    std::this_thread::sleep_for(std::chrono::milliseconds(1));
  }
  // Close the service
  Service::instance()->close();
}
else
{
  std::cout << "Error occurred during service initialization.\n";
}
Notice that after the program exits the main loop due to some interruption, you must close the rendering service using Service::close(). This is the end of the main( ) function.
So far you have defined a rendering service but it does not render anything. Next, we will implement a ServiceListener, create a simple scene graph, and render it on a render area. Wait!! Before that, please allow me to introduce the ServiceListener, RenderArea, and RenderAreaListener classes of RemoteViz.
Service Listener
The service listener listens for events and notifications from the RemoteViz service and allows an application to respond. In your application, you will implement a listener class derived from the base class RemoteViz::Rendering::ServiceListener and attach the listener object to the rendering service.
The listener is notified of events from the service and a typical sequence of calls to the service listener is:
onConnectedClient()- Client object has been created and is connected to the serviceonPendingCreateRenderArea()/onPendingShareRenderArea()- RenderArea object is about to be created or sharedonInstantiatedRenderArea()- RenderArea object has been createdonInitializedClient()- Client is running and bandwidth calibration has finished
Application is running ...onDisposingRenderArea()- Connection to RenderArea has been closed so it is to be disposedonDisposedRenderArea()- RenderArea object has been disposedonDisconnectedClient()- Client object has been disposed
Usually, you will define a listener class derived from RemoteViz::Rendering::ServiceListener and override the virtual function onInstantiatedRenderArea() to create a simple scene graph. The other virtual functions will inherit the base class implementation for now.
#include <RemoteViz/Rendering/ServiceListener.h>
#include <RemoteViz/Rendering/RenderAreaListener.h>
...
class HelloConeServiceListener : public RemoteViz::Rendering::ServiceListener
{
public:
  void onInstantiatedRenderArea(std::shared_ptr<RemoteViz::Rendering::RenderArea> renderArea) override
  {
    /// Implementation in next section
    ...
  }
};
RenderArea
RemoteViz::Rendering::RenderArea class defines a rendering area for the application to render an Open Inventor scene. This class provides access to the scene manager to define and manage the scene graph. You can call getSceneManager() to access the manager object.
  // Access the scene manager and define a scene graph for RenderArea
  renderArea->getSceneManager()->setSceneGraph(...);
  ...
This class also provides access to the touch manager for managing gesture events from touch screen devices. Use the getTouchManager() method to access the manager object. The touch manager only recognizes gestures that were registered. You can use the touch manager method addRecognizer() to register a custom gesture, but usually, you will just call addDefaultRecognizers() method to register all default gestures.
  ...
  renderArea->getTouchManager()->addDefaultRecognizers();
  ...
RenderArea Listener
A RenderArea listener receives notifications from a RenderArea and allows an application to manage them by performing specific actions. You can categorize these notifications as follows:
- Connection: Triggered when a connection has been created, initialized and disposed
- Rendering: Triggered at the start/end of rendering and when an image is sent to the client
- Input events: Triggered on mouse, keyboard and touch events
- Messages: Triggered when a message is sent from the client
To manage these events and notifications, you need to implement a listener class derived from the base class RenderAreaListener and override relevant virtual methods. A typical sequence of calls to this listener is:
onOpenedConnection()- Connection object has been createdonInitializedConnection()- Connection is fully initialized- While application is rendering ...
onPreRender()- Scene will be renderedonPostRender()- Scene has been renderedonSendingFrame()- Rendered image will be sent to the client
onClosedConnection()- Connection object has been disposed
Usually you will attach a listener object to the RenderArea in the ServiceListener::onInstantiatedRenderArea() method.
void onInstantiatedRenderArea(std::shared_ptr<RemoteViz::Rendering::RenderArea> renderArea) override
{
  // Instance of RenderAreaListener to manage the renderArea events (default behaviors).
  auto renderAreaListener = std::make_shared<RemoteViz::Rendering::RenderAreaListener>();

  // Attach the renderAreaListener instance to the RenderArea
  renderArea->addListener(renderAreaListener);
  ...
}
Next, we will create a scene graph for rendering and assign it to the RenderArea inside this virtual method.
Create a Scene Graph
Use a SceneExaminer node as the root of the scene graph.
Classic Open Inventor examiner viewers are not available for RemoteViz applications, so we will use a SceneExaminer to provide headlight and camera manipulations similar to the classic viewers.
void onInstantiatedRenderArea(std::shared_ptr<RemoteViz::Rendering::RenderArea> renderArea) override
{
  ...
  ...
  // Instantiate a SceneExaminer to interact with the camera
  SceneExaminer *examiner = new SceneExaminer();

  // Build a scene graph
  examiner->addChild(new SoCone());
  examiner->addChild(new SoGradientBackground());

  // Set the scene graph for renderArea
  renderArea->getSceneManager()->setSceneGraph(examiner);

  // Adjust camera to view-all of the scene
  examiner->viewAll(renderArea->getSceneManager()->getViewportRegion());
  }
To manage events from touch screen devices, register gesture recognizers using the touch manager.
void onInstantiatedRenderArea(std::shared_ptr<RemoteViz::Rendering::RenderArea> renderArea) override
{
  ...
  // Add recognizers for gesture events
  renderArea->getTouchManager()->addDefaultRecognizers();
  ...
}
Besides the main( ) function that creates and launches the rendering service, you now have implemented a basic RemoteViz service. Next, we will create a simple web-viewer for the client and introduce the JavaScript API used for developing the client viewer.
Client - Web Viewer
In this section, we will create a web-viewer for client application using the RemoteViz Client API. We will first define HTML header and body, then implement a method to initialize a render area and connect to the service.
HTML Header
You need to add the following code sample to define an HTML header in the index.html. The first line specifies the DOCTYPE of a document. This lets a browser know the version of the HTML document.
Here, you have to declare the web application as HTML5 by using the <!DOCTYPE html> declaration.
<!DOCTYPE html>
<html>
<head>
  <title>RemoteViz Example</title>
  <link rel="stylesheet" type="text/css" href="loader.css"> <!-- include the loader css -->
  <script type="text/javascript" src="RemoteVizClient.js"></script> <!-- include the Client API -->
  <script type="text/javascript">
  ...
  </script>
</head>
The <link> tag includes a reference to an external style sheet file loader.css which defines the spin animation while the page is loading. This CSS file is provided with RemoteViz example.
The RemoteViz Client JavaScript API is loaded using the <script> tag and the location (URL) of JavaScript file RemoteVizClient.js is specified in the src attribute. This JavaScript API enables the development of HTML5 client application.
Usually, you will implement the client-side scripts (JavaScript) inside the second <script> tag.
HTML Body
Next, we will define a minimal HTML body that contains a couple of <div> elements. The "loaderGroup" div contains the graphic temporarily displayed during network calibration. The one with id "TheDiv" represents the canvas (container) for a render area.
<body onload="init()" bgcolor="silver">
  <!-- loader notifying the network bandwidth calibration -->
  <div id="loaderGroup" style="display:none;">
    <div id="loader"></div>
    <div id="loaderText">Network calibration</div>
  </div>
  <div id="TheDiv"> <!-- element displaying the renderArea -->
  </div>
</body>
</html>
In the <body> element, we associate the init() method with the onload event. So when the web page is loaded, the on-load event is triggered and the assigned script is executed.
Initialize RenderArea
Now let's implement the init() method inside the second <script> tag. First, create an instance of a render area on the server and assign it to the theRenderArea variable. The first argument, "TheDiv", is the id of the render area container which must be a <div> element; the second and third arguments are the requested width and height of the container.
<script type="text/javascript">
  var theRenderArea = null;
  // This function is called immediately after the page is loaded.
  function init()
  {
    // Initialization of the renderArea.
    theRenderArea = new RemoteVizRenderArea("TheDiv", 640, 480);
    ...
    ...
  }
</script>
Next, add a listener to capture predefined messages/events from the RemoteViz service. Only events related to connection and network calibration states are captured by the service handler. For a complete list of predefined messages, please see ServiceHandler.
The following code sample defines a handler function service(). We use this function to display or hide the network calibration graphic.
  function init()
  {
    ...
    // Listen start and stop bandwidth calibration events to display or hide the loader.
    theRenderArea.addServiceListener(service);
    ...
  }
  // This function is called when a predefined notification is received from the service
  function service(event)
  {
    var message = event[0];
    switch(message) {
      case "startNetworkCalibration":
      case "pendingNetworkCalibration":
        document.getElementById("loaderGroup").style.display = "inline";
        break;
      case "finishedNetworkCalibration":
        document.getElementById("loaderGroup").style.display = "none";
        break;
    }
  }
Connect RenderArea to Service
Finally, to connect the client application to the RemoteViz service, we will use the connectTo() method and provide the service URL.
  function init()
  {
    // Initialize the renderArea on the server
    theRenderArea = new RemoteVizRenderArea("TheDiv", 640, 480);
    ...
    // Connects to the service. IP address and the port refer to those of the service
    theRenderArea.connectTo("ws://127.0.0.1:8080/TheCone");
  }
The service URL string must contain the address and port of the RemoteViz service. The address can be a domain name or an IP address. The URL may contain a render area identifier and a query string composed of a series of field-value pairs.
The following URL, for example, includes a query string requesting specific height and width.
theRenderArea.connectTo("ws://127.0.0.1:8080/TheCone?requestedWidth=100&requestedHeight=100");
"TheCone" in the above URL specifies the identifier (Id) of the requested render area. If no render area with specified Id exists, the RemoteViz service will create one and ServiceListener::onPendingCreateRenderArea event will be triggered on the server-side. If the render area with specified Id already exists, then ServiceListener::onPendingShareRenderArea event will be triggered.
Build and Run the Example
Now that we have covered the basics of programming with the RemoteViz API and implemented a minimal rendering service as well as a client application, let's run a RemoteViz example locally.
Build the Demo
To build the demo example using Visual Studio on Windows, you will need to ...
- Open the solution (.sln) file located in \$(OIVHOME)/examples/source/RemoteViz/HelloCone/HelloConeRenderingService/
- Select either Debug or Release configuration and build the RemoteVizHelloConeRenderingService project.
The service executable is created in the default output directory \$(OIVHOME)/examples/bin/arch-Windows-x86_64-msvc15-\$(Configuration)/RemoteViz/.
Run the Demo
To start the rendering service, navigate to the output directory (using either File Explorer or PowerShell) and run RemoteVizHelloConeRenderingService.exe. If successful, you will see a message saying "... Rendering Service is running".
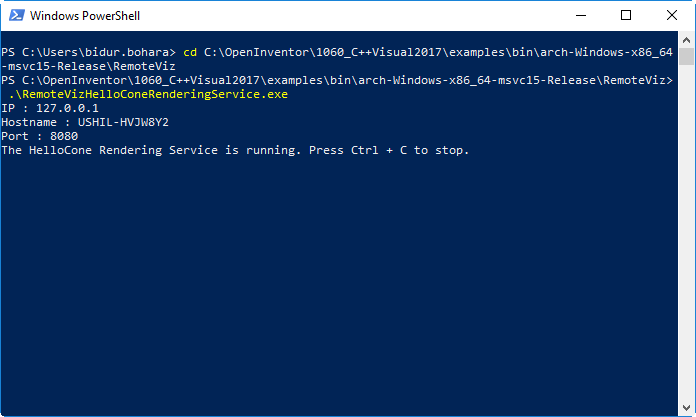
Notice that the service is using the IP address 127.0.0.1 and port 8080 as defined in main( ) function.
Once the service is running, let's navigate to \Clients\HTML5\ and open index.html in your browser. If the render area is successfully created, you should first see the "Network Calibration" message and then an image of a gray cone on the render area.
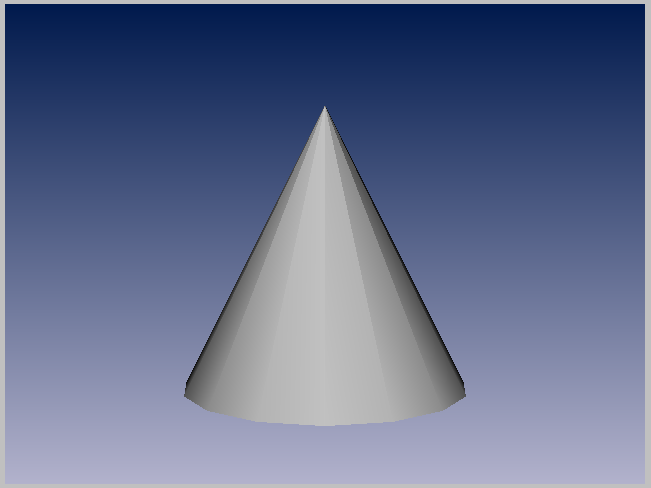
The rendering service renders the scene graph and sends the rendered image to the client. In this example, the scene graph consists of only SoCone and SoGradientBackground nodes.
Demo in Docker
Docker containers wrap a piece of software in a complete filesystem that contains everything needed to run: code, runtime, system tools, system libraries - anything that can be installed on a server. This guarantees that the software will always run the same, regardless of its environment.
Containers running on a single machine share the same operating system kernel; they start instantly and use less RAM. Images are constructed from layered filesystems and share common files, making disk usage and image downloads much more efficient.
Docker can build images automatically by reading the instructions from a Dockerfile. A Dockerfile is a text document that contains all the commands a user could call on the command line to assemble an image. Using docker build, users can create an automated build that executes several command-line instructions in succession.
We provide the Dockerfile necessary to build a container image that can run a demo.
A linux distribution is required and NVIDIA graphics card too.
To run a RemoteViz demo, an OpenGL context is required. To get an OpenGL context in a Docker container, you have to install the Nvidia container toolkit on the host machine and use the Open Inventor headless package.
Run the RemoteVizHelloCone demo in a Docker container
Be sure you have copied your password.dat in OIVHOME/License folder and set the Open Inventor environment variables: OIVHOME, OIVARCH.
Go to the Docker folder in OIVHOME/examples/source/RemoteViz/Docker.
Open the ReadMe.txt file and follow the instructions.
User Interaction
Usually, the client applications are highly interactive, and they must provide some way for the user to interact with the scene. We use a SceneExaminer node as the root of the scene graph. The SceneExaminer is an extension of the SceneInteractor node that provides camera and headlight manipulations like panning, zooming, and orbiting.
SceneExaminer is either in NAVIGATION mode (the default, similar to viewing mode) or SELECTION mode. The user must press the ESC key to toggle between the two interaction modes. In NAVIGATION mode, user input events are automatically handled to modify the camera, and these events are not sent to the application scene graph. In SELECTION mode, all events are sent to the application scene graph, and the user input events can be captured and processed appropriately by the application on the server-side using SoEventCallback node.
{
  // Event callback node to handle input events
  SoEventCallback* eventCB = new SoEventCallback;
  eventCB->addEventCallback(SoMouseButtonEvent::getClassTypeId(), mouseEventCB);
  ...
}

// Mouse button events handler
void mouseEventCB(void* userData, SoEventCallback* node)
{
  // Application implementation
  ...
}
You may also capture the user input events in the RenderAreaListener class, before sending (or not sending) them to the scene graph. The three types of events that can be intercepted are Mouse, Keyboard, and Touch events. Typically, you will overload the listener methods of the RenderAreaListener to intercept these events.
The following code sample implements a listener that is triggered when a MouseUp event is received from the client. For a complete set of listener methods that you may override, please see RenderAreaListener.
bool RenderAreaListener::onMouseDown(std::shared_ptr<RemoteViz::Rendering::RenderArea> renderArea,
std::shared_ptr<RemoteViz::Rendering::Connection> sender,int x,int y, SoMouseButtonEvent::Button button)
{
  // Application implementation
  ...
  // Return true to process the event; forward it to be handled by the scene graph
  // Return false to ignore the event.
  return true;
}
Client-Service Communication
The RemoteViz service and the client application can communicate by exchanging application specified messages, which can either be a binary encoded or text messages. The support of binary encoded messages is particularly useful when using tools like Protocol Buffers or Apache Thrift.
To send a message from the client application to the RemoteViz service, use the RemoteVizRenderArea::sendMessage() method. On the server-side, RenderAreaListener::onReceivedMessage() event will be triggered if a message from the client is received. Inside this event handler, you will parse the messages and handle them accordingly.
The following code sample defines a javascript function that sends a text message to the RemoteViz service to switch the color of a rendered geometry, for example.
  function switchColor()
  {
    if (isColorEnabled)
    {
      theRenderArea.sendMessage("color off");
      isColorEnabled = false;
    }
    else
    {
      theRenderArea.sendMessage("color on");
      isColorEnabled = true;
    }
  }
Likewise, to send a message from the service to the client applications, we will use the sendMessage() method of RenderArea on the server-side. To capture application specified messages from the service, you need to add a message listener on the client-side.
The following code sample adds a listener on messages received from the service.
  function init()
  {
    ...
    // Add a listener on the received message event.
    theRenderArea.addMessageListener(messageReceive);
    ...
  }
  // This function is called when messages are received from the service
  function messageReceive(message)
  {
    // Application implementation
    ...
  }
Encoding Frames for Streaming
When a client connects to the RemoteViz service, by default, RemoteViz will use PNG encoding for still frames and JPEG for interactive frames. In the latter case, it may be acceptable to use (for example) lossy JPEG encoding to maximize performance, then switch to loss-less PNG encoding for the "still" frame when the user interaction is finished.
Video encoding (H.264 or VP9) generally provides better performance (frames per second) than image encoding (JPEG and PNG). However, this depends on many factors. Video encoded frames usually require less bandwidth, but the encoding of each frame can take more time.
To define what encoder to use for still and interactive frames, you need to access a FrameEncoders object which is passed to the RenderAreaListener methods onOpenedConnection(), onInitializedConnection() and onRefusedEncoder(). In the onOpenedConnection() method, use the FrameEncoders object to request non-default encoders.
void RenderAreaListener::onOpenedConnection(std::shared_ptr<RemoteViz::Rendering::RenderArea>, std::shared_ptr<RemoteViz::Rendering::Connection>, std::shared_ptr<RemoteViz::Rendering::FrameEncoders> frameEncoders)
{
  // Set H264 NVENC as frame encoder for this connection. It requires an NVIDIA GPU Kepler or higher and CUDA Toolkit 10.1 or higher.
  frameEncoders->setInteractiveEncoder( RemoteViz::Rendering::FrameEncoders::H264_NVENC );
  frameEncoders->setStillEncoder( RemoteViz::Rendering::FrameEncoders::H264_NVENC );
}
You may use the ConnectionSettings::isSupportedEncoders() method to query if the proposed encoders are available. Note that, currently, it is not possible to mix video and image encoding. In other words, the interactive and still encoders must be both video encoders (H264, VP9) or both image encoders (JPEG, PNG).
The onRefusedEncoder() method will be called if one of the encoders is not supported in the current environment or the combination of encoders is not supported. In that case, use the FrameEncoders object to determine which encoder is invalid (see getStillEncoderStatus() and getInteractiveEncoderStatus()), then set new encoders. onRefusedEncoder() will be called again if the requested encoders are not valid.
void RenderAreaListener::onRefusedEncoder(std::shared_ptr<RemoteViz::Rendering::RenderArea>, std::shared_ptr<RemoteViz::Rendering::Connection>, std::shared_ptr<RemoteViz::Rendering::FrameEncoders> frameEncoders)
{
  // At least one of the frame encoders cannot be initialized, set others encoders.
  if ( frameEncoders->getInteractiveEncoder() == RemoteViz::Rendering::FrameEncoders::H264_NVENC &&
       frameEncoders->getStillEncoder() == RemoteViz::Rendering::FrameEncoders::H264_NVENC )
  {
    frameEncoders->setInteractiveEncoder( RemoteViz::Rendering::FrameEncoders::JPEG );
    frameEncoders->setStillEncoder( RemoteViz::Rendering::FrameEncoders::PNG );
  }
  else if ( frameEncoders->getInteractiveEncoder() == RemoteViz::Rendering::FrameEncoders::JPEG &&
            frameEncoders->getStillEncoder() == RemoteViz::Rendering::FrameEncoders::PNG )
  {
    ...
  }
  ...
}
Note that, currently, when using video encoding, the interactive and still encoders must be the same, e.g. both H264_NVENC.
Secure Connection
RemoteViz uses the WebSocket protocol to enable communication between the client and the service. In a production environment, it is highly recommended to use secure WebSocket. Using a secure WebSocket connection improves confidentiality and reliability because the connection is encrypted with Transport Layer Security (TLS), which reduces the risk of a variety of attacks such as man-in-the-middle tampering with your data.
The WebSocket Secure (WSS) protocol is to WebSocket protocol (WS) what HyperText Transfer Protocol Secure (HTTPS) is to HyperText Transfer Protocol (HTTP). Like HTTPS, WSS requires a TLS certificate issued to a fully qualified domain name such as www.openinventor.com.
Service:
To enable a secure connection between the client and the rendering service, you need to use the enableSecureConnection() method of RemoteViz::Rendering::ServiceSettings on the server-side. This method takes two arguments: the path to a file containing the public TLS certificate and the path to a file containing the private key.
int main()
{
  ...
  // Enable secure connections
  settings->enableSecureConnection("certificate.crt", "private.key");
  ...
}
If the private key is protected by a passphrase, you can provide the passphrase using the ServiceListener::onRequestedPrivateKeyPassphrase() listener.
Client:
To connect the client application to the RemoteViz service using a secure connection, you will use the connectTo() method with the domain name associated to your TLS certificate and the prefix "wss://" instead of "ws://".
  // Connects to the service by using the secure WebSocket protocol (wss://)
  theRenderArea.connectTo("wss://www.yourdomain.com/TheCone");
The last step is to setup a web server like Apache or Nginx to serve the web page index.html over your domain name and an HTTPS connection using your TLS certificate. The web server has also to be configured as a reverse proxy to redirect WSS incoming connections to the rendering service.
Further information about how to setup web server as reverse proxy.